Secure Data Sharing at Scale
This is the first installment of Data in Motion, our new tech bulletin from C4ADS’ Data and Software teams. We’re opening up about how we tackle complex data challenges, from building secure infrastructure for partner collaboration and processing massive datasets to integrating emerging technologies into our analysis. We’d love to hear from you: What technical challenges are you facing? What would you like to see us cover next?
Most global security intelligence dies in a PDF. C4ADS takes a different approach: We’ve built a technology stack that treats data as infrastructure. Our systems ingest and normalize terabytes of public data — from trade records to satellite imagery to corporate registries — then make it queryable, shareable, and actionable for the partners who need it most. This isn’t just about doing our own analysis better. It’s about multiplying our impact by embedding curated intelligence directly into the workflows of enforcement agencies, journalists, and compliance teams across geographies and industries.
C4ADS’ Data and Technology teams pride ourselves on our ability to empower partners regardless of their unique tech stacks, platform architecture, and capabilities. We primarily use AWS S3 as our data lake, but we’re sensitive to the fact that our partners might not be comfortable with this solution. Securely transferring data at scale shouldn’t require our partners to navigate AWS complexity or compromise on security. Traditional approaches to transferring large amounts of data from S3, the AWS CLI or creating users via IAM Identity Center, create unnecessary friction when dealing with external partners. The CLI requires coordination in sharing access keys, configuring destination buckets, or spinning up EC2 instances, while creating IAM users risks unintended access to other resources.
AWS Transfer Family offers a different path. Through this service, we can set up an SFTP (Secure File Transfer Protocol) server that presents our S3 storage as a familiar file system over SFTP. Partners connect to this server endpoint and interact with our data using standard SFTP commands — no AWS knowledge required. Access is restricted to the exact S3 bucket and prefix where the data lives. Our partners don’t need any setup on their end — just a private SSH key and any means to use SFTP, whether through the terminal or a client like Cyberduck. No AWS credentials to manage. No complex configurations to coordinate. Just secure, straightforward data transfer that meets partners where they are.
This article walks through the steps of setting up an SFTP server that enables partners to securely retrieve data from our S3 buckets using their preferred SFTP tools (we use Cyberduck as an example in this case), ensuring they can access the data they need to advance our shared mission of disrupting malign networks worldwide. While Transfer Family is a widely used AWS service, implementing it for investigative partnerships requires navigating scattered documentation across AWS services, IAM configurations, SSH key management, and security best practices. We’re documenting our approach — shaped by real partner needs — to help similar organizations implement secure data sharing faster.
Technical Guide #
Set Up the SFTP Server
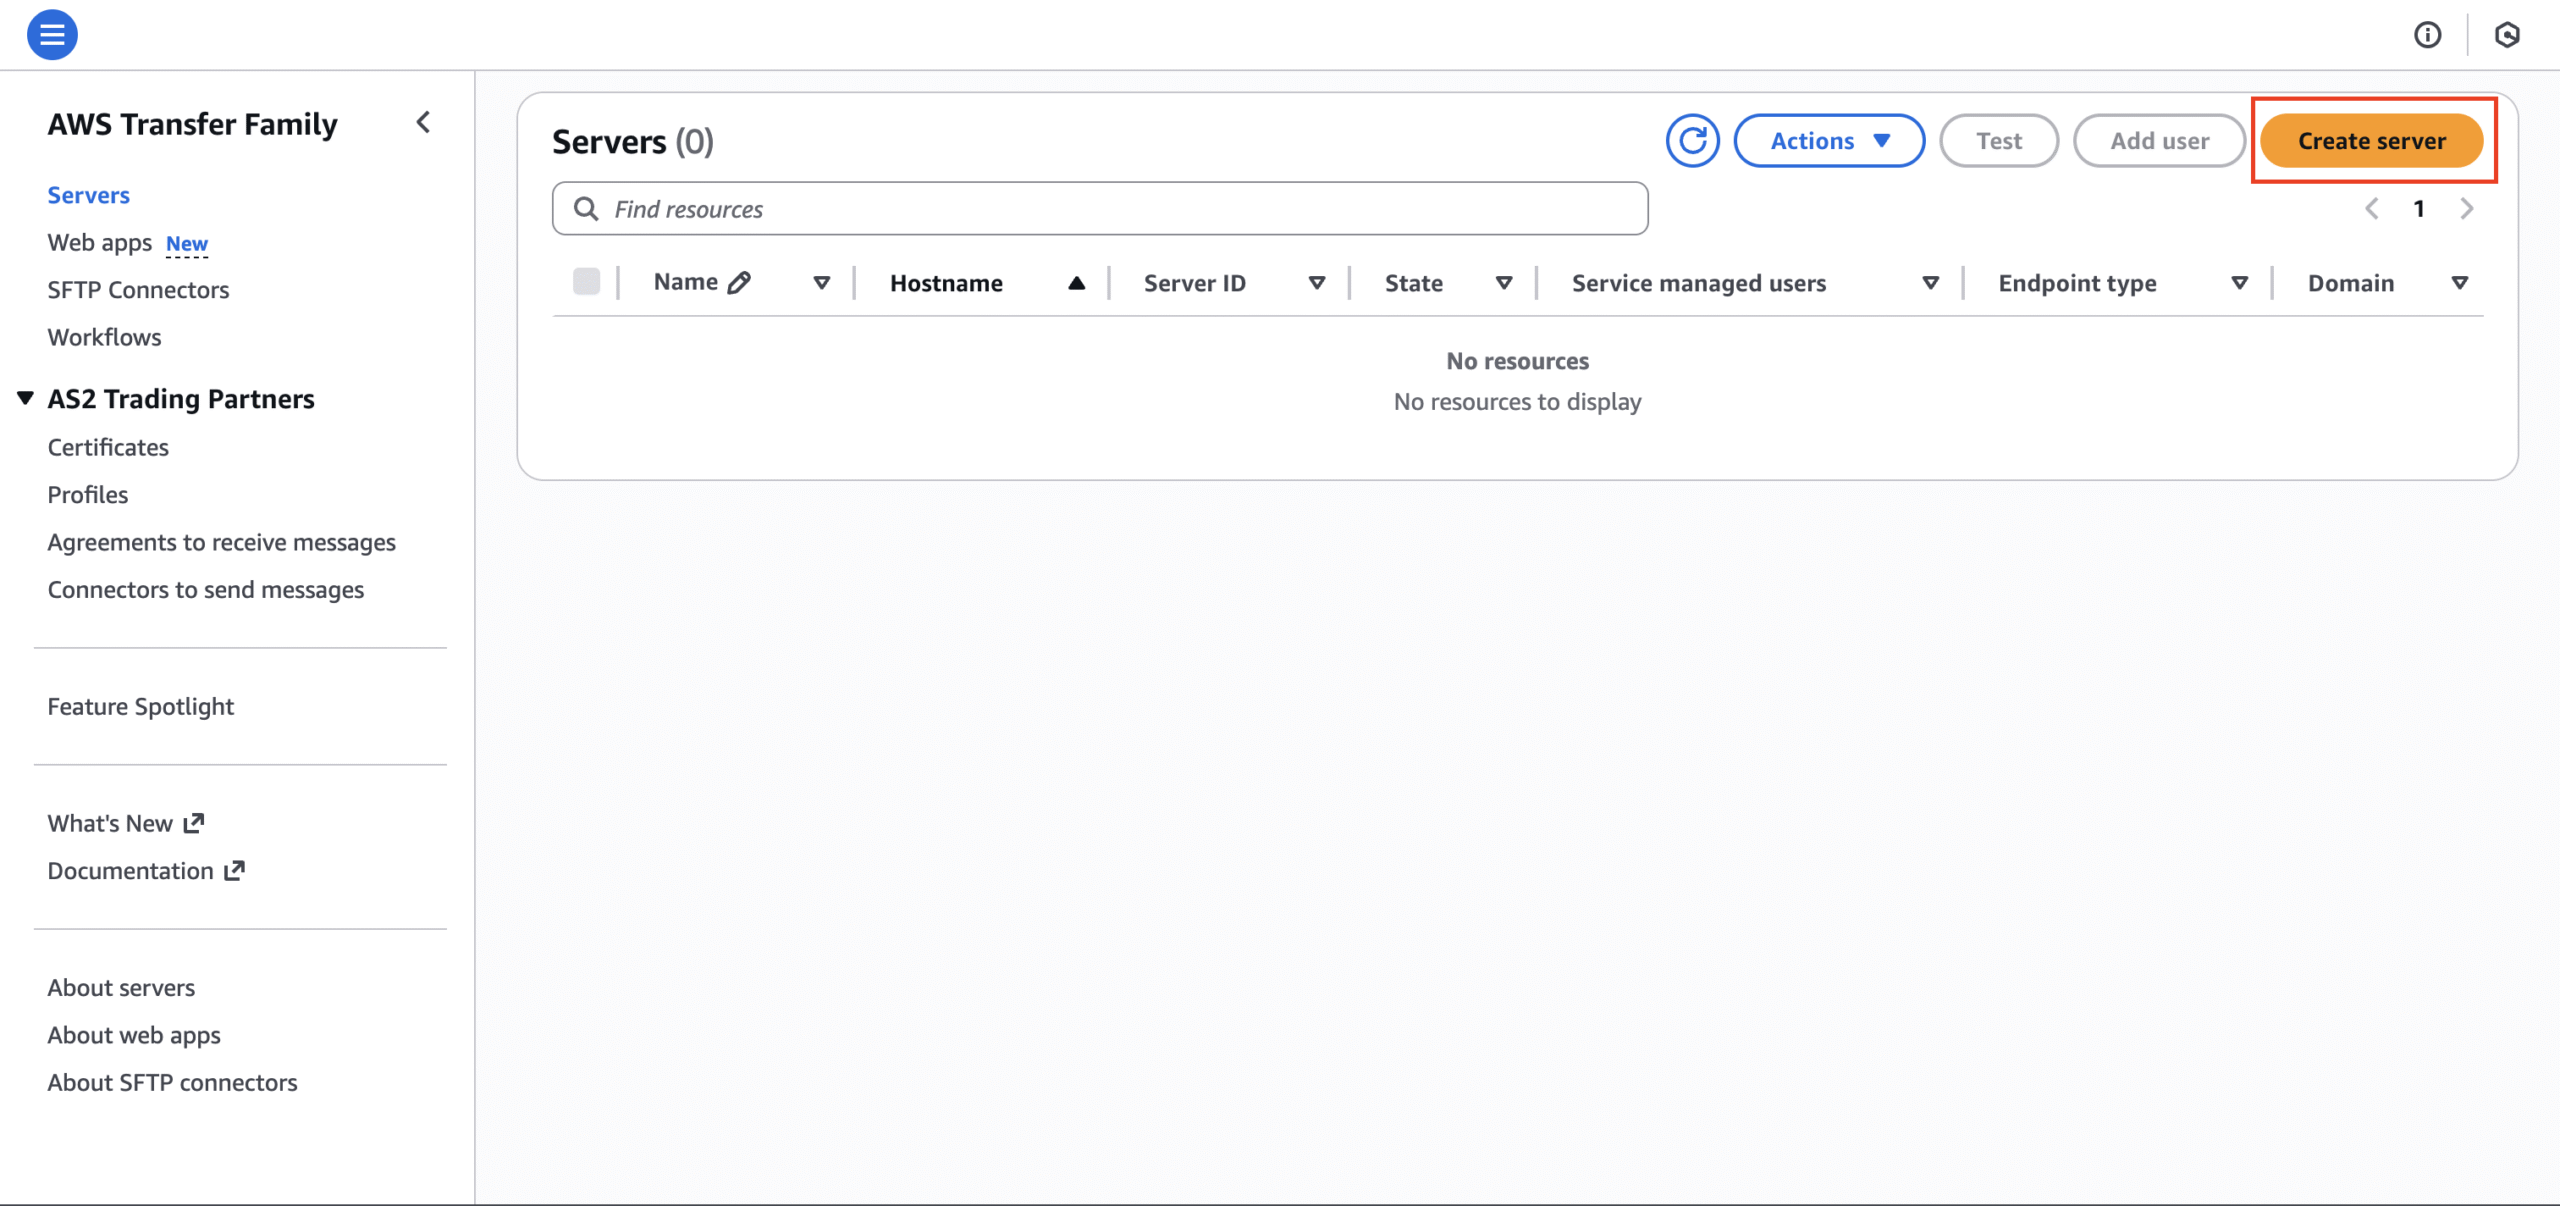
- Go to the Transfer Family page → Servers → Create server
Why did we pick SFTP?
We selected SFTP from the protocols available through AWS Transfer Family because it has broader industry support than S3’s native protocol. SFTP was also a specific customer requirement, and Transfer Family offered the most straightforward implementation path.
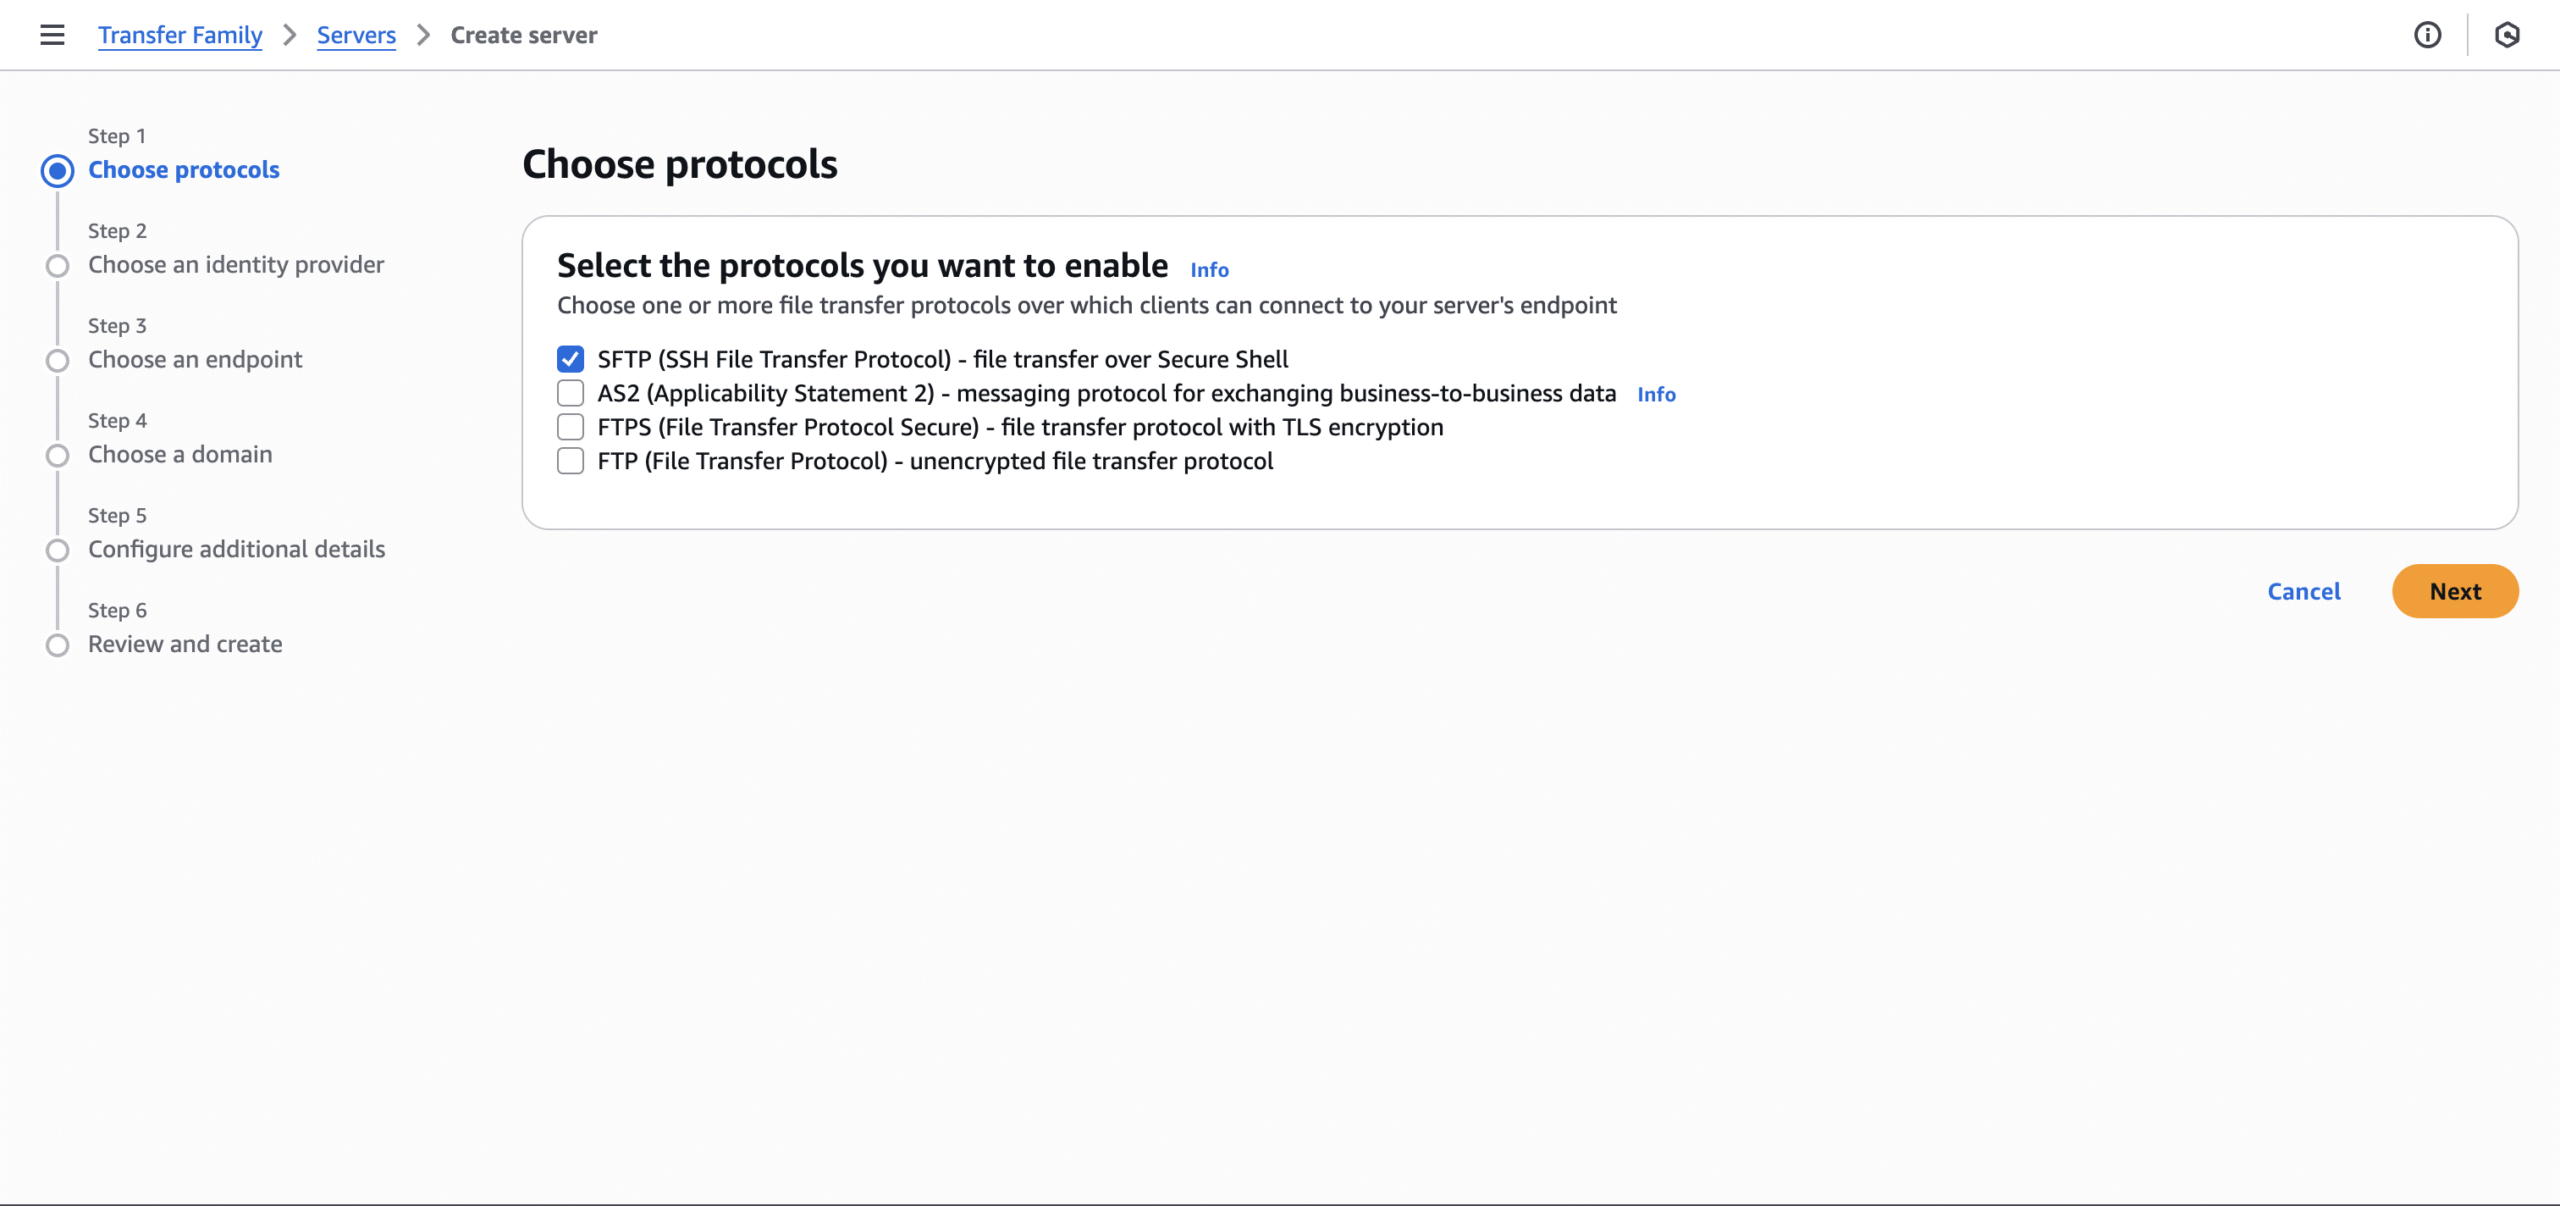
- Step 1: Make sure SFTP is selected for the protocol.
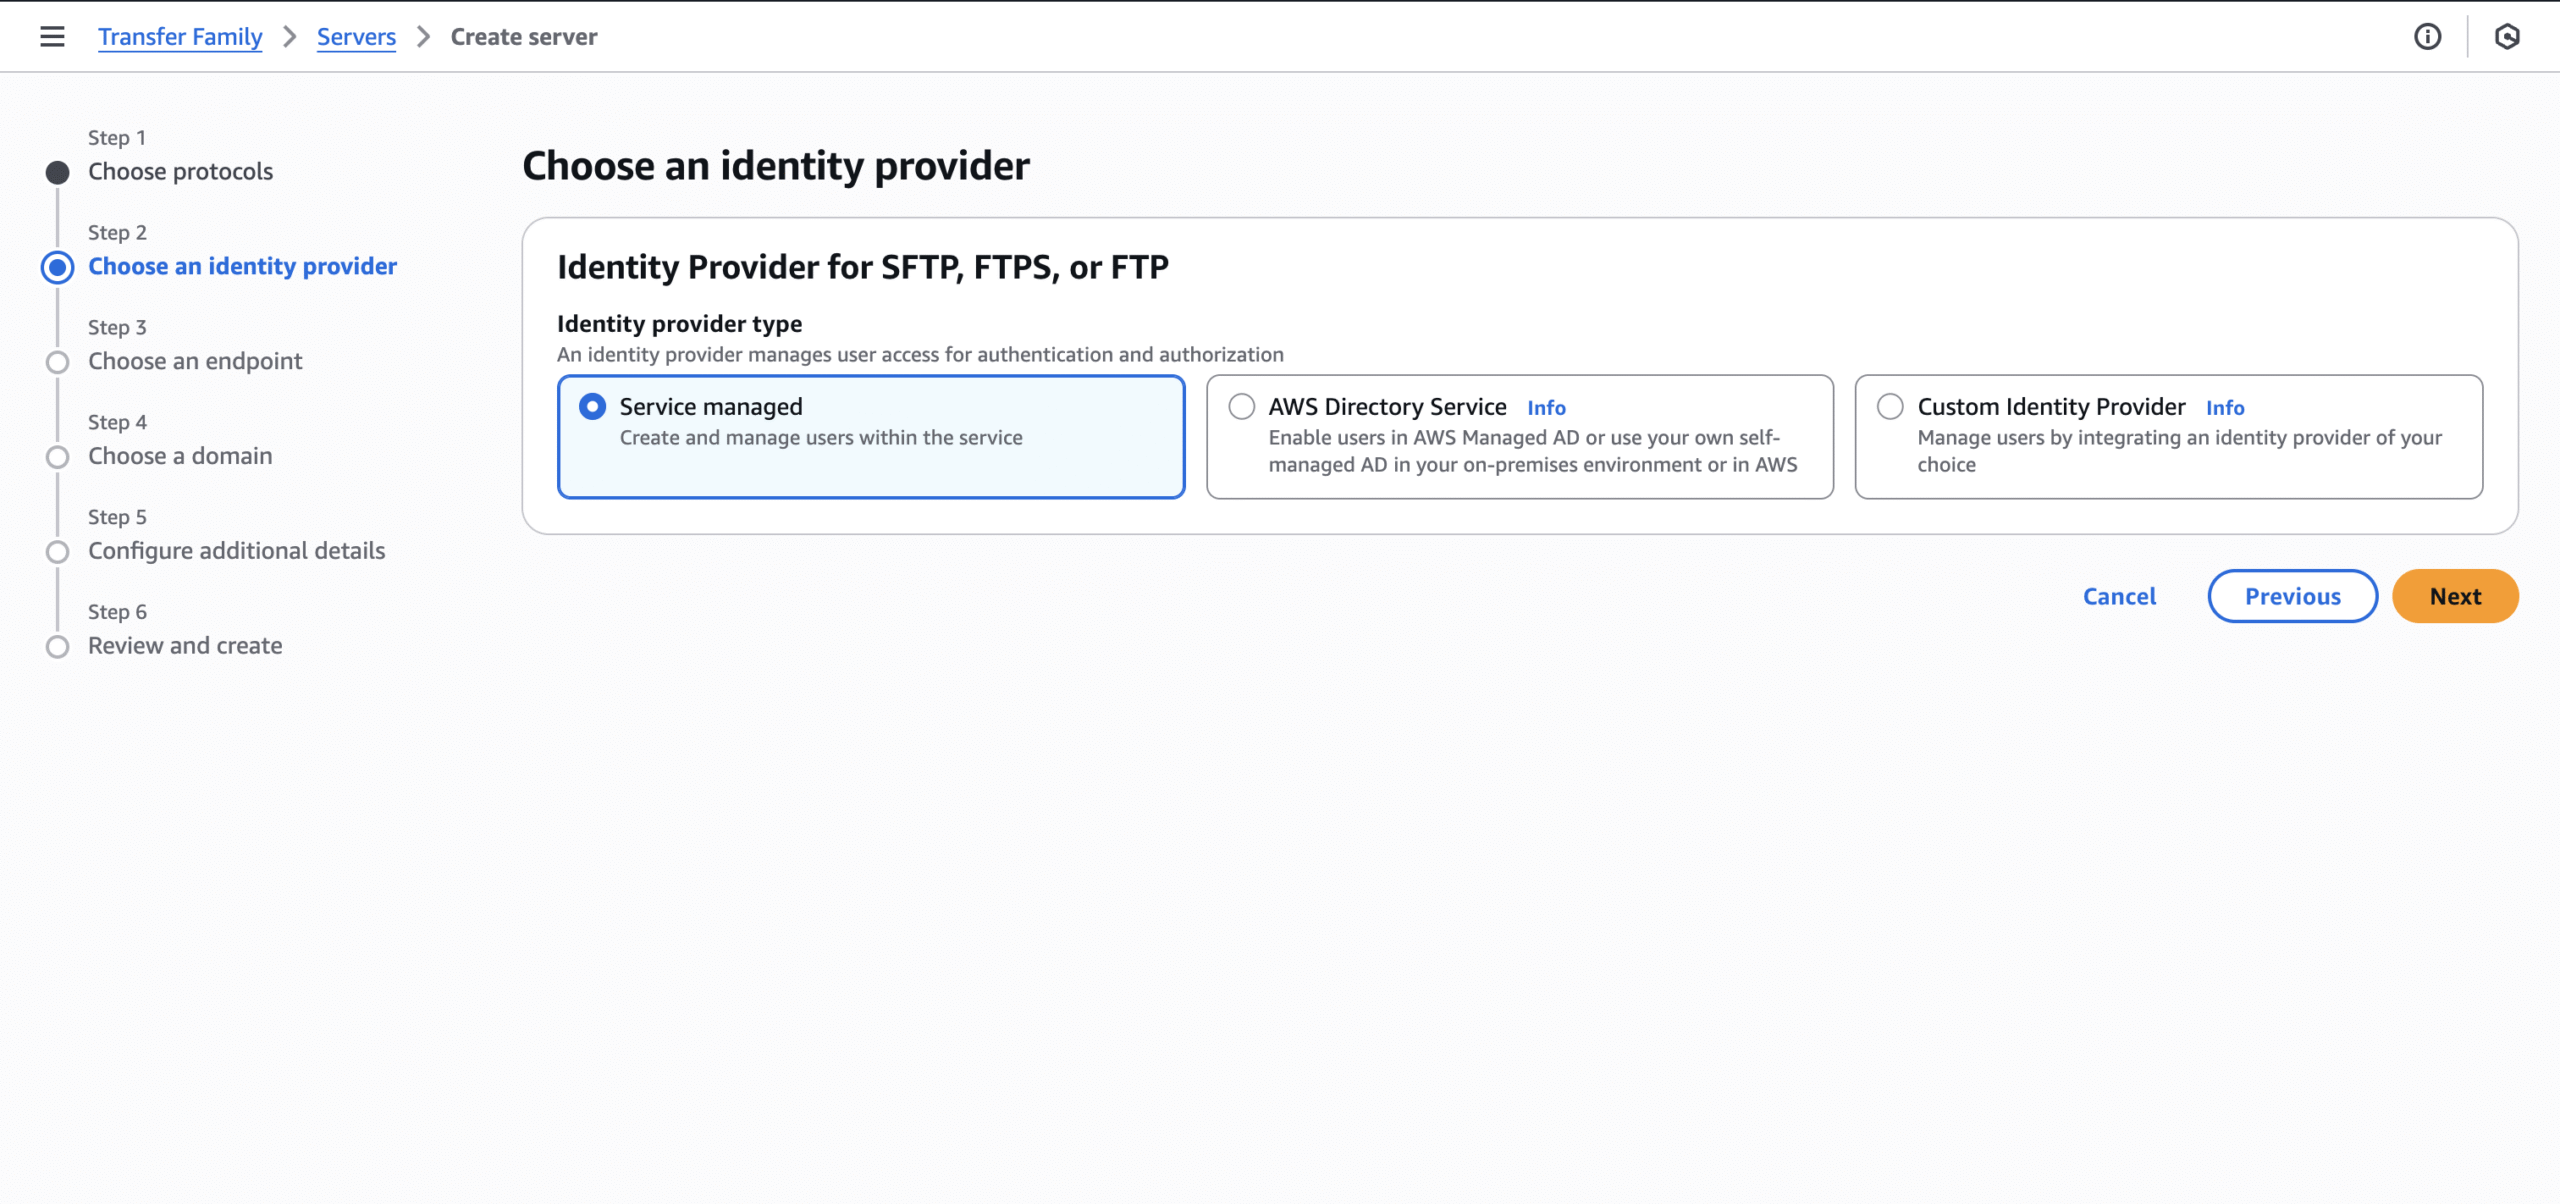
- Step 2: Use “Service managed” for identity provider.
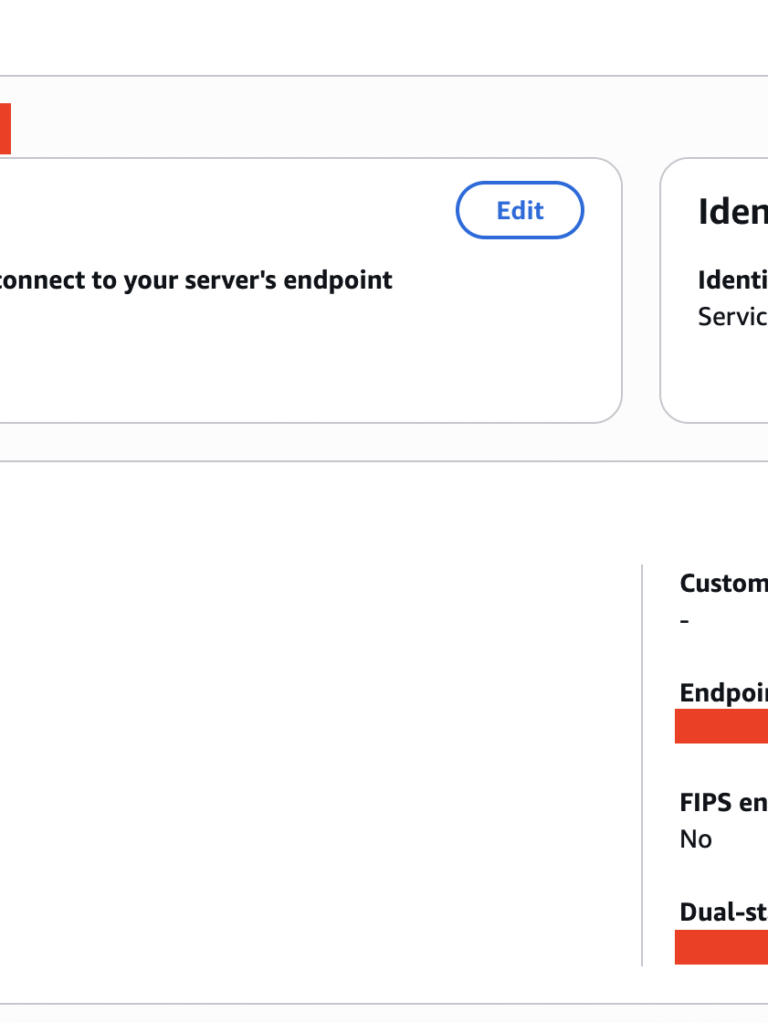
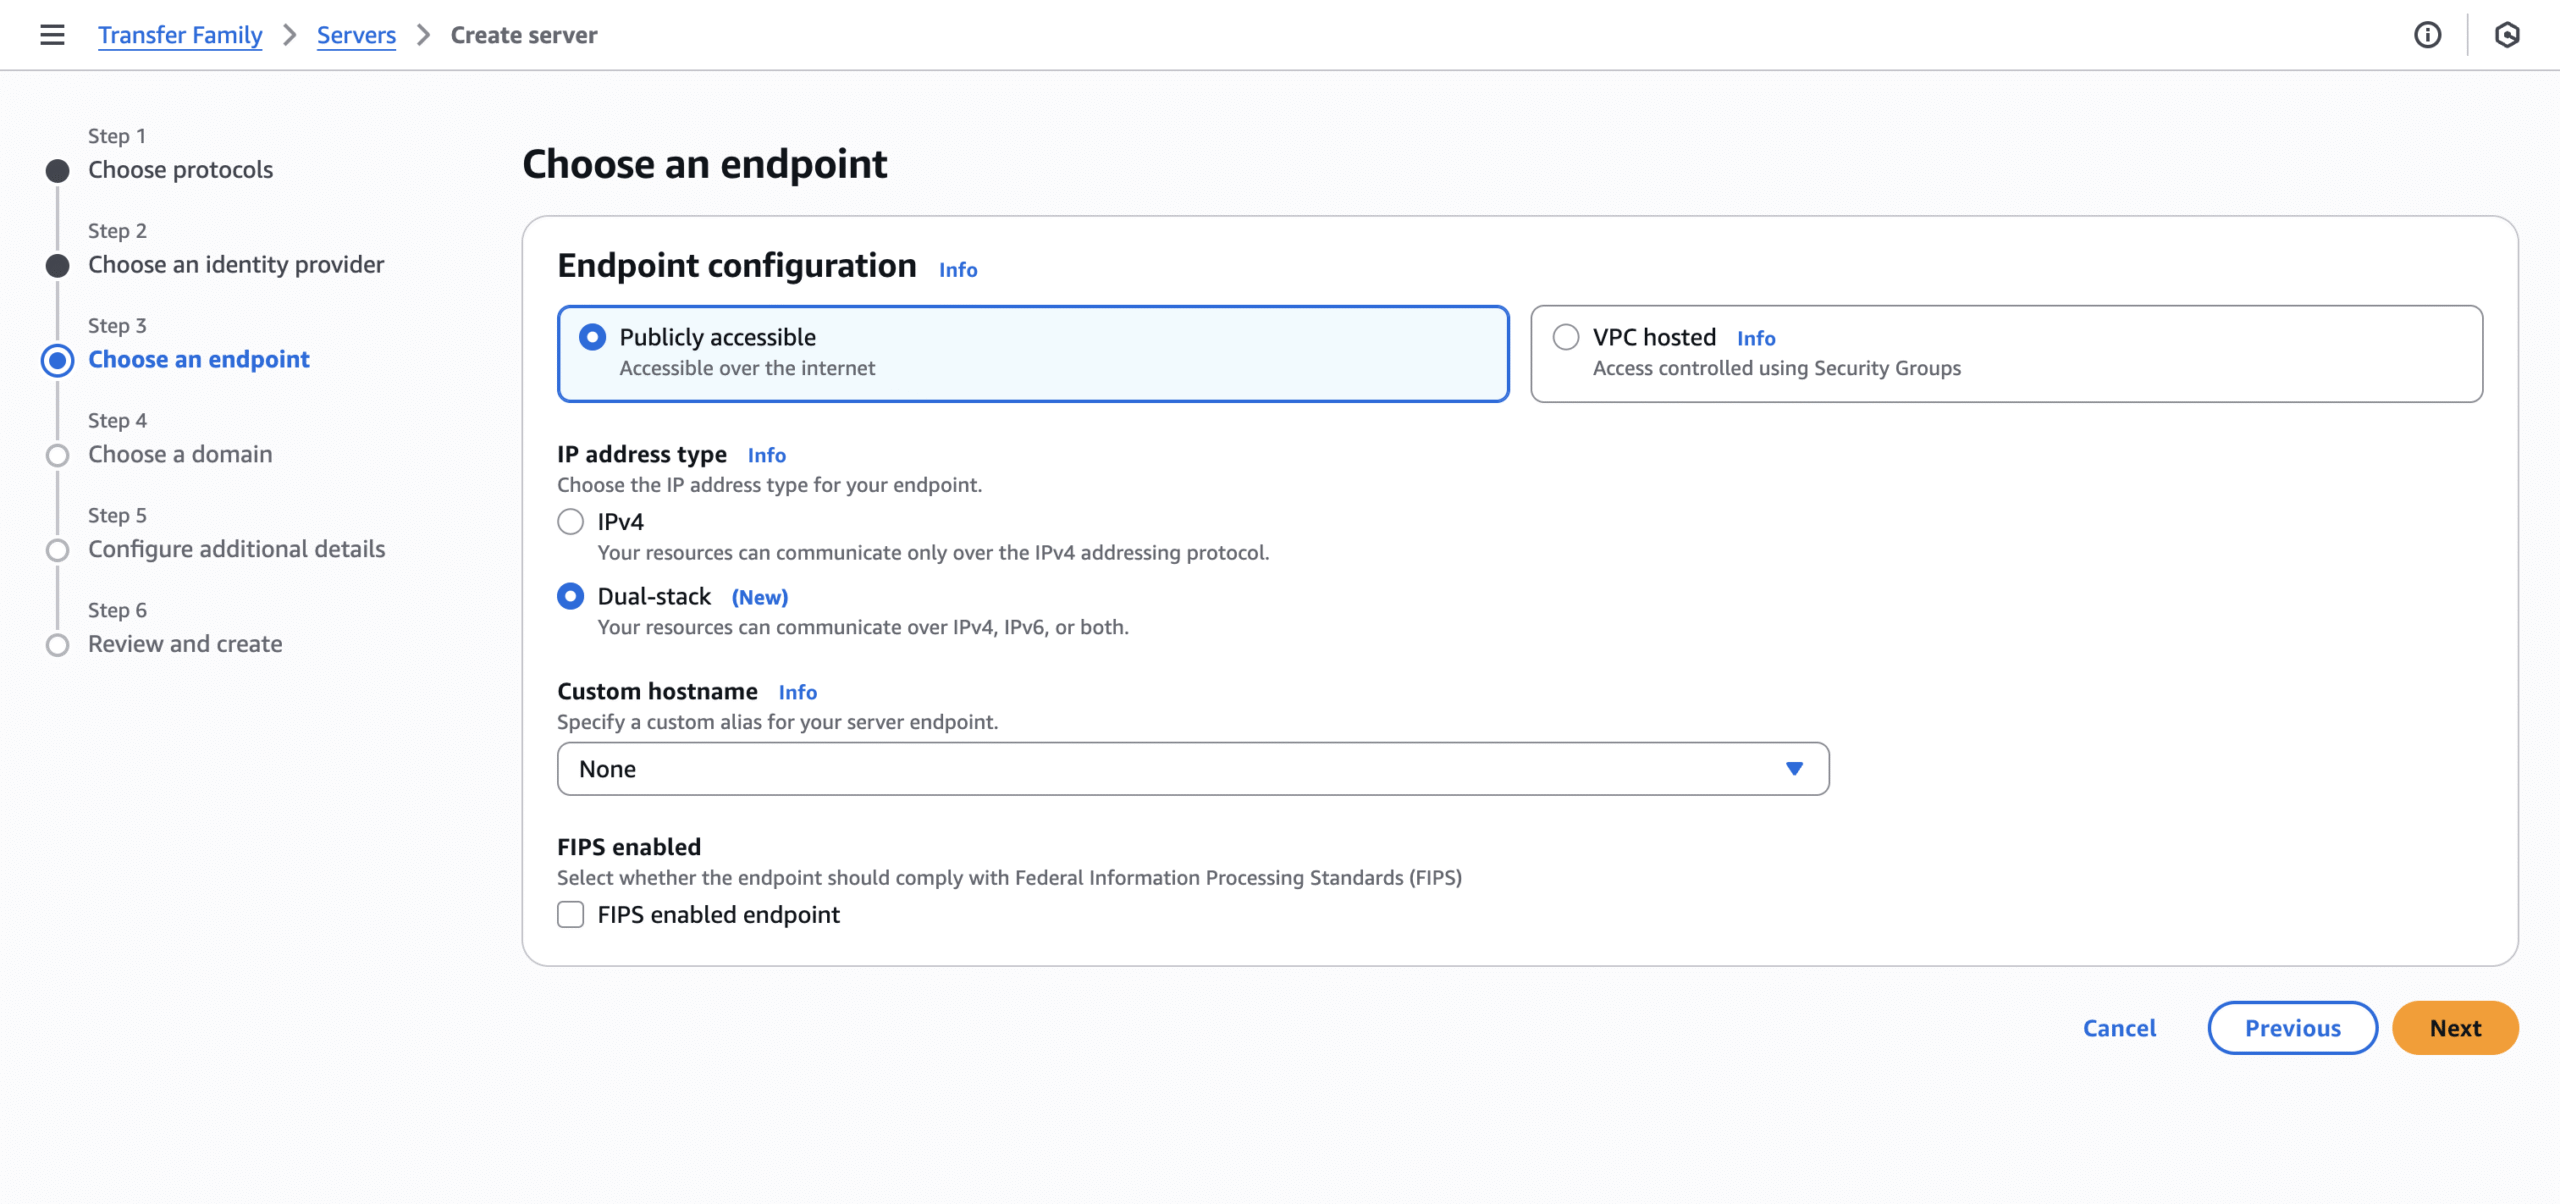
- Step 3: The endpoint should be publicly accessible. Here, select the “Dual-stack” IP address type. Certain SFTP clients, like Cyberduck, only work through IPv6. You can leave the rest of the options unchanged.
- Optional: specify an alias hostname.
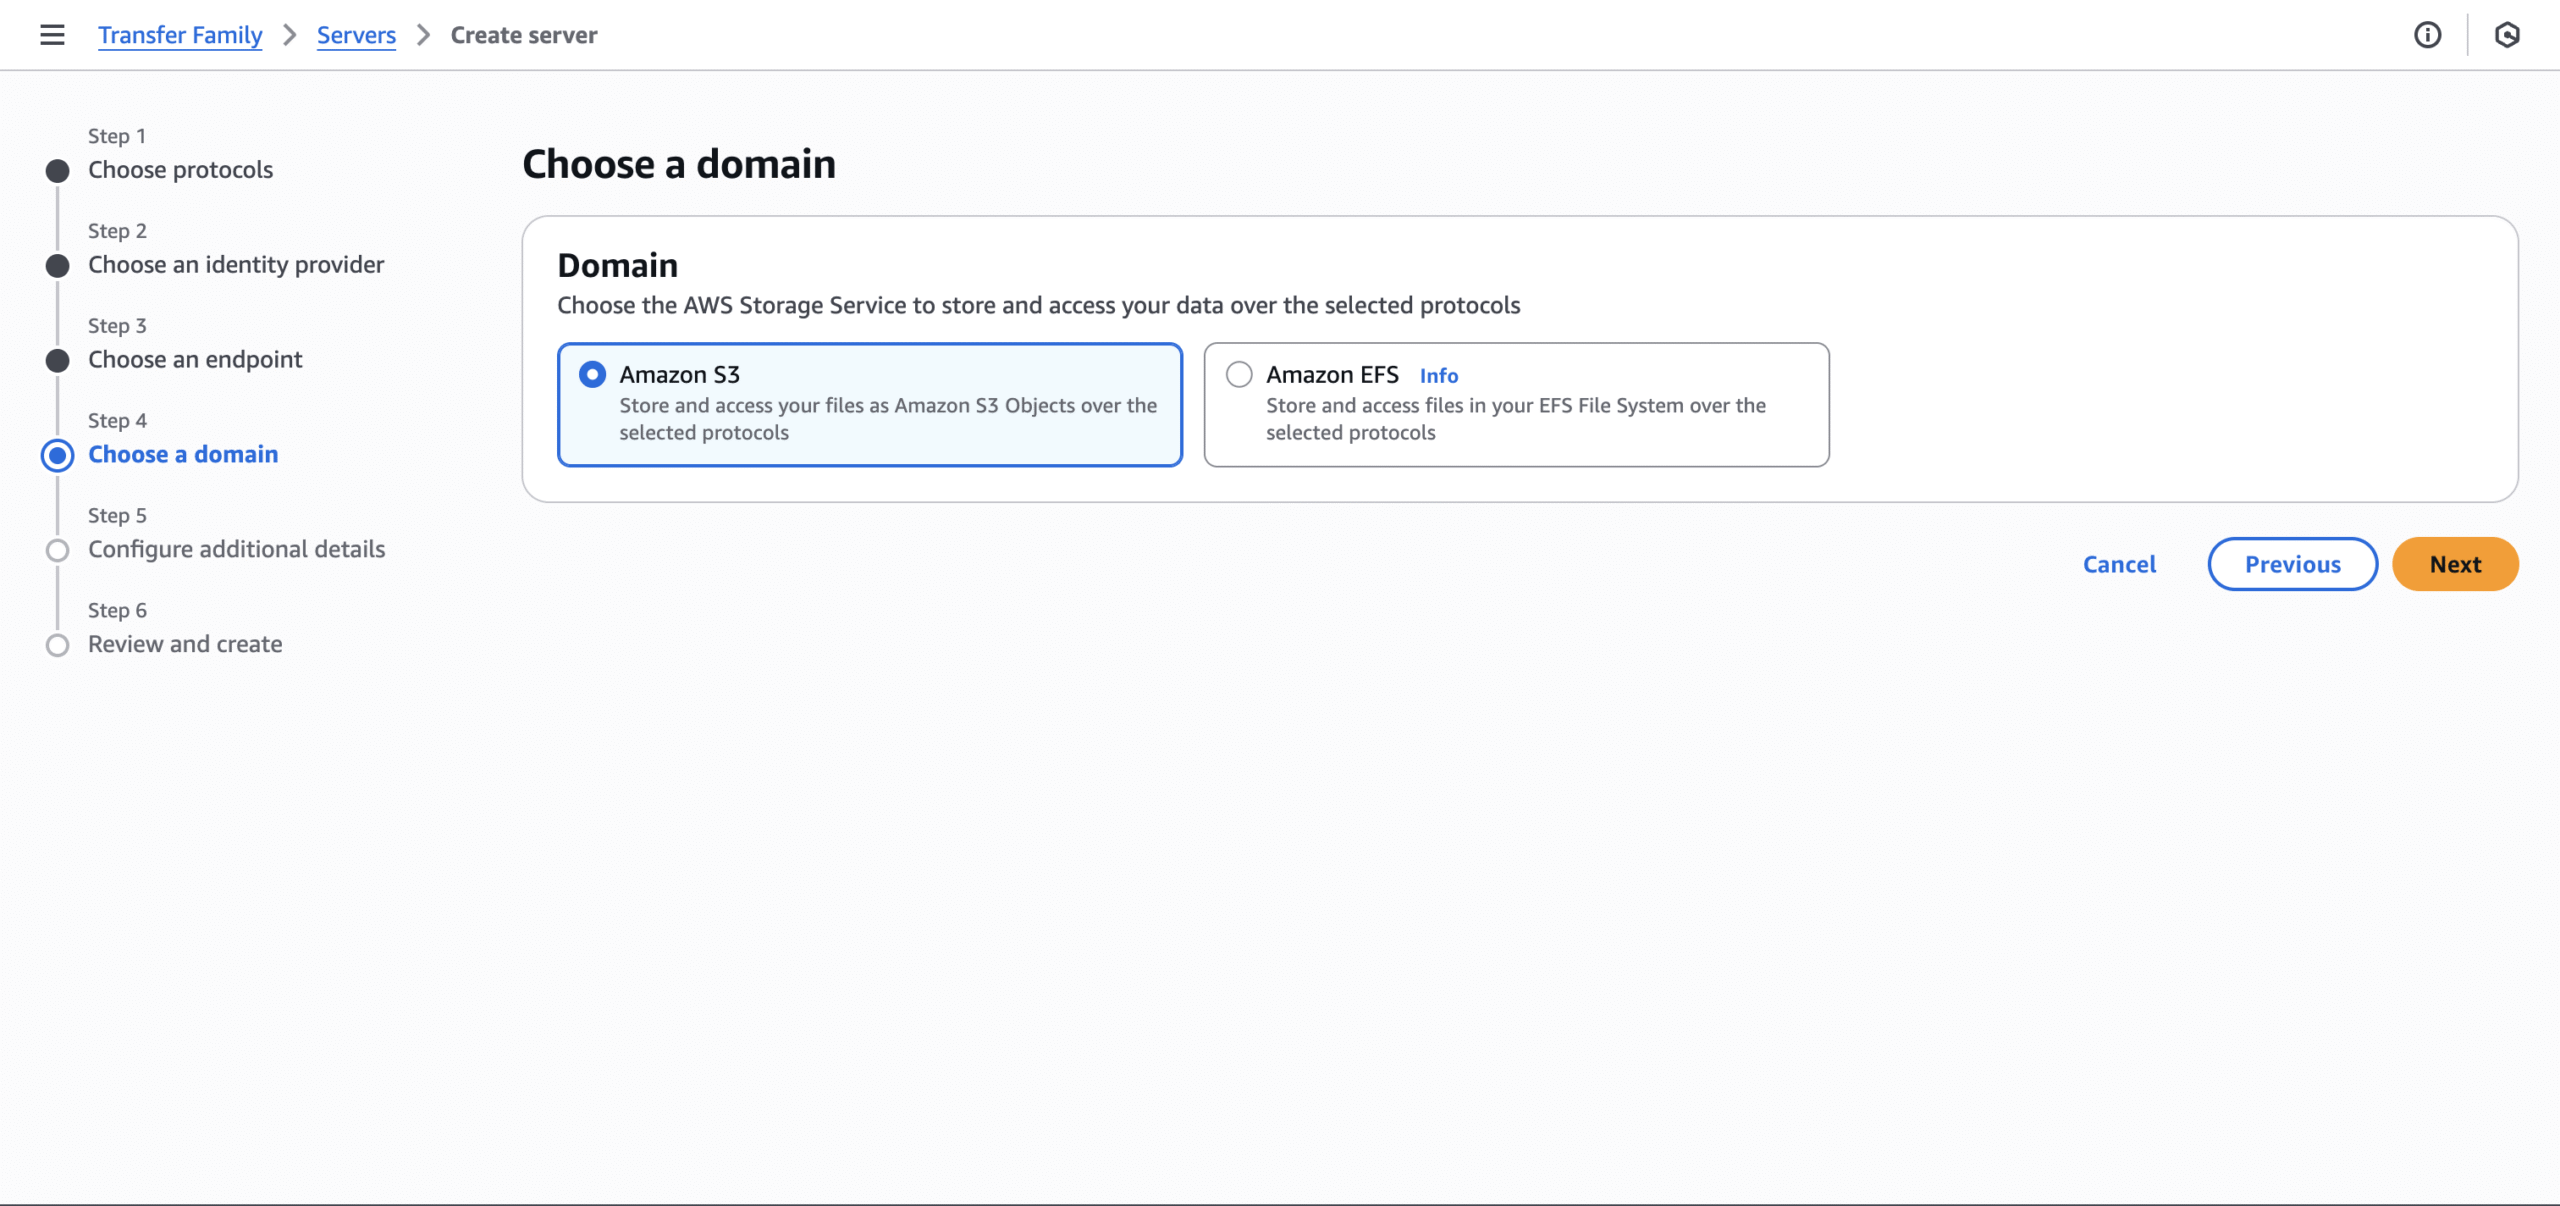
- Step 4: Use “Amazon S3” for the domain.
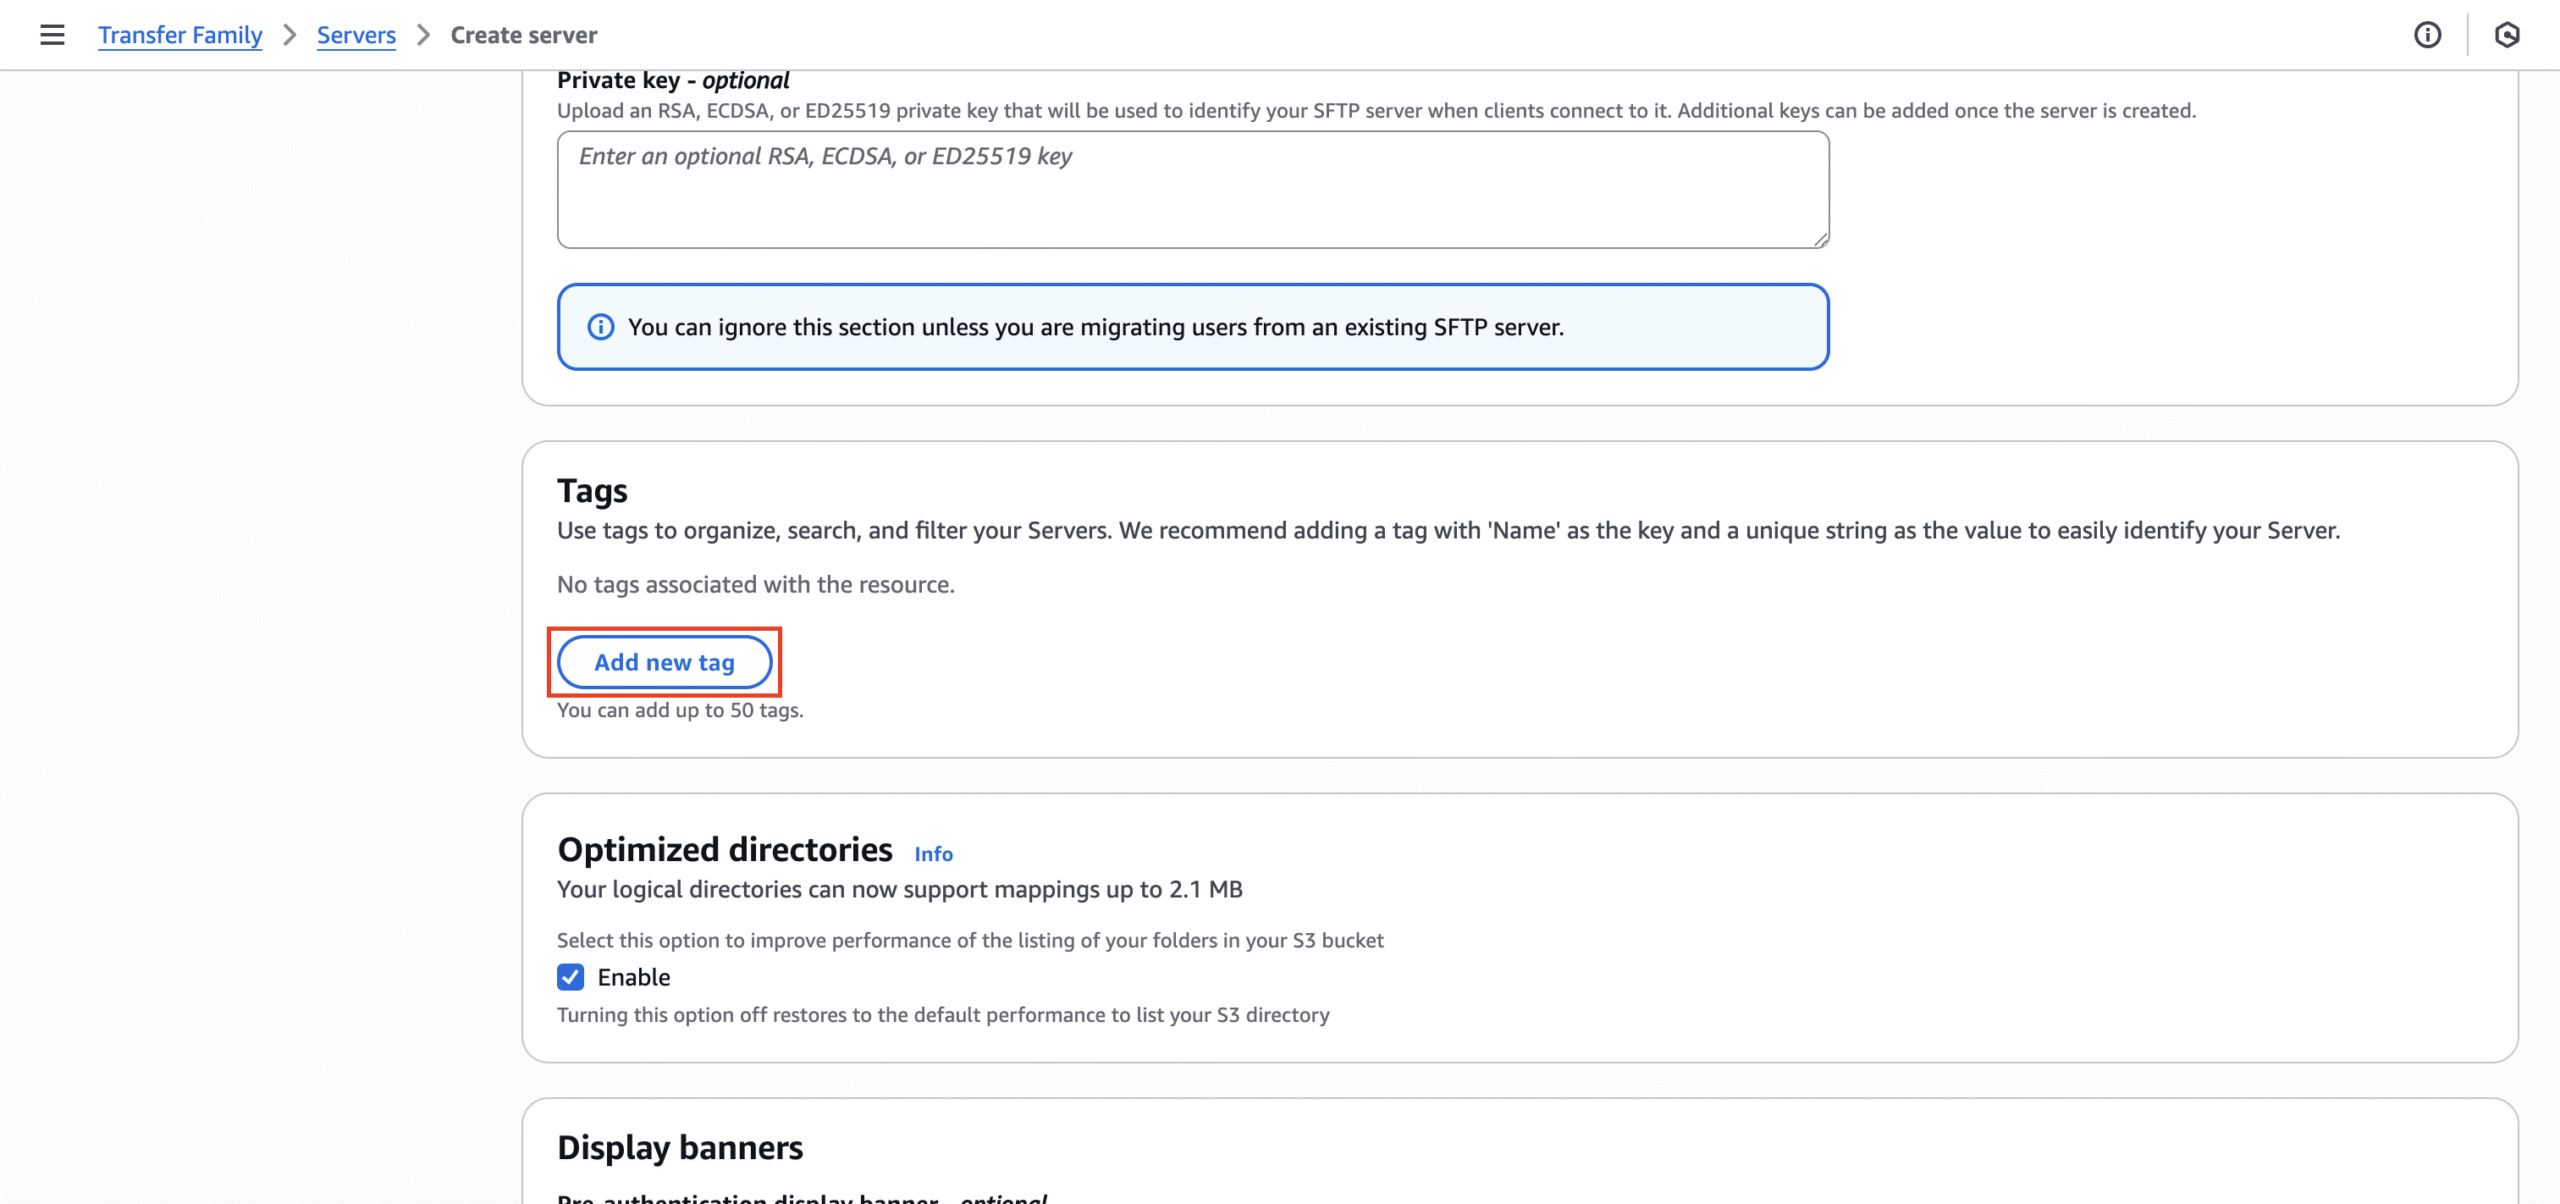
- Step 5 (Optional): Add the “Name” tag. This way you can create an easily recognizable identifier on the console.
- Step 6: Review the configuration then select “Create server” at the bottom.
Set up the User for the SFTP Server
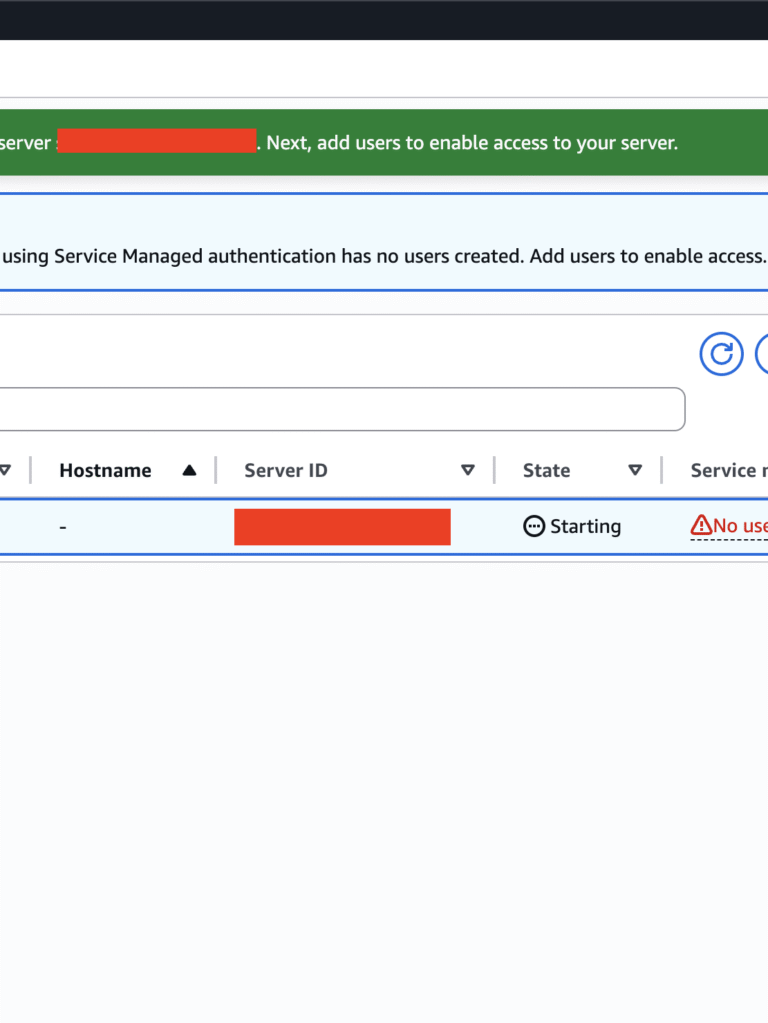
Upon creating the server, the console will state that you will need to add users to enable access. You must create an account for each end user within the Transfer Family server. This will require some IAM setup as well. It’s best practice to provide temporary, least-necessary privileges. This means you should grant access only to the data path the user needs, and remove their access from both the server and IAM Manager once the transfer is complete.
Set Up the IAM Policy and Role
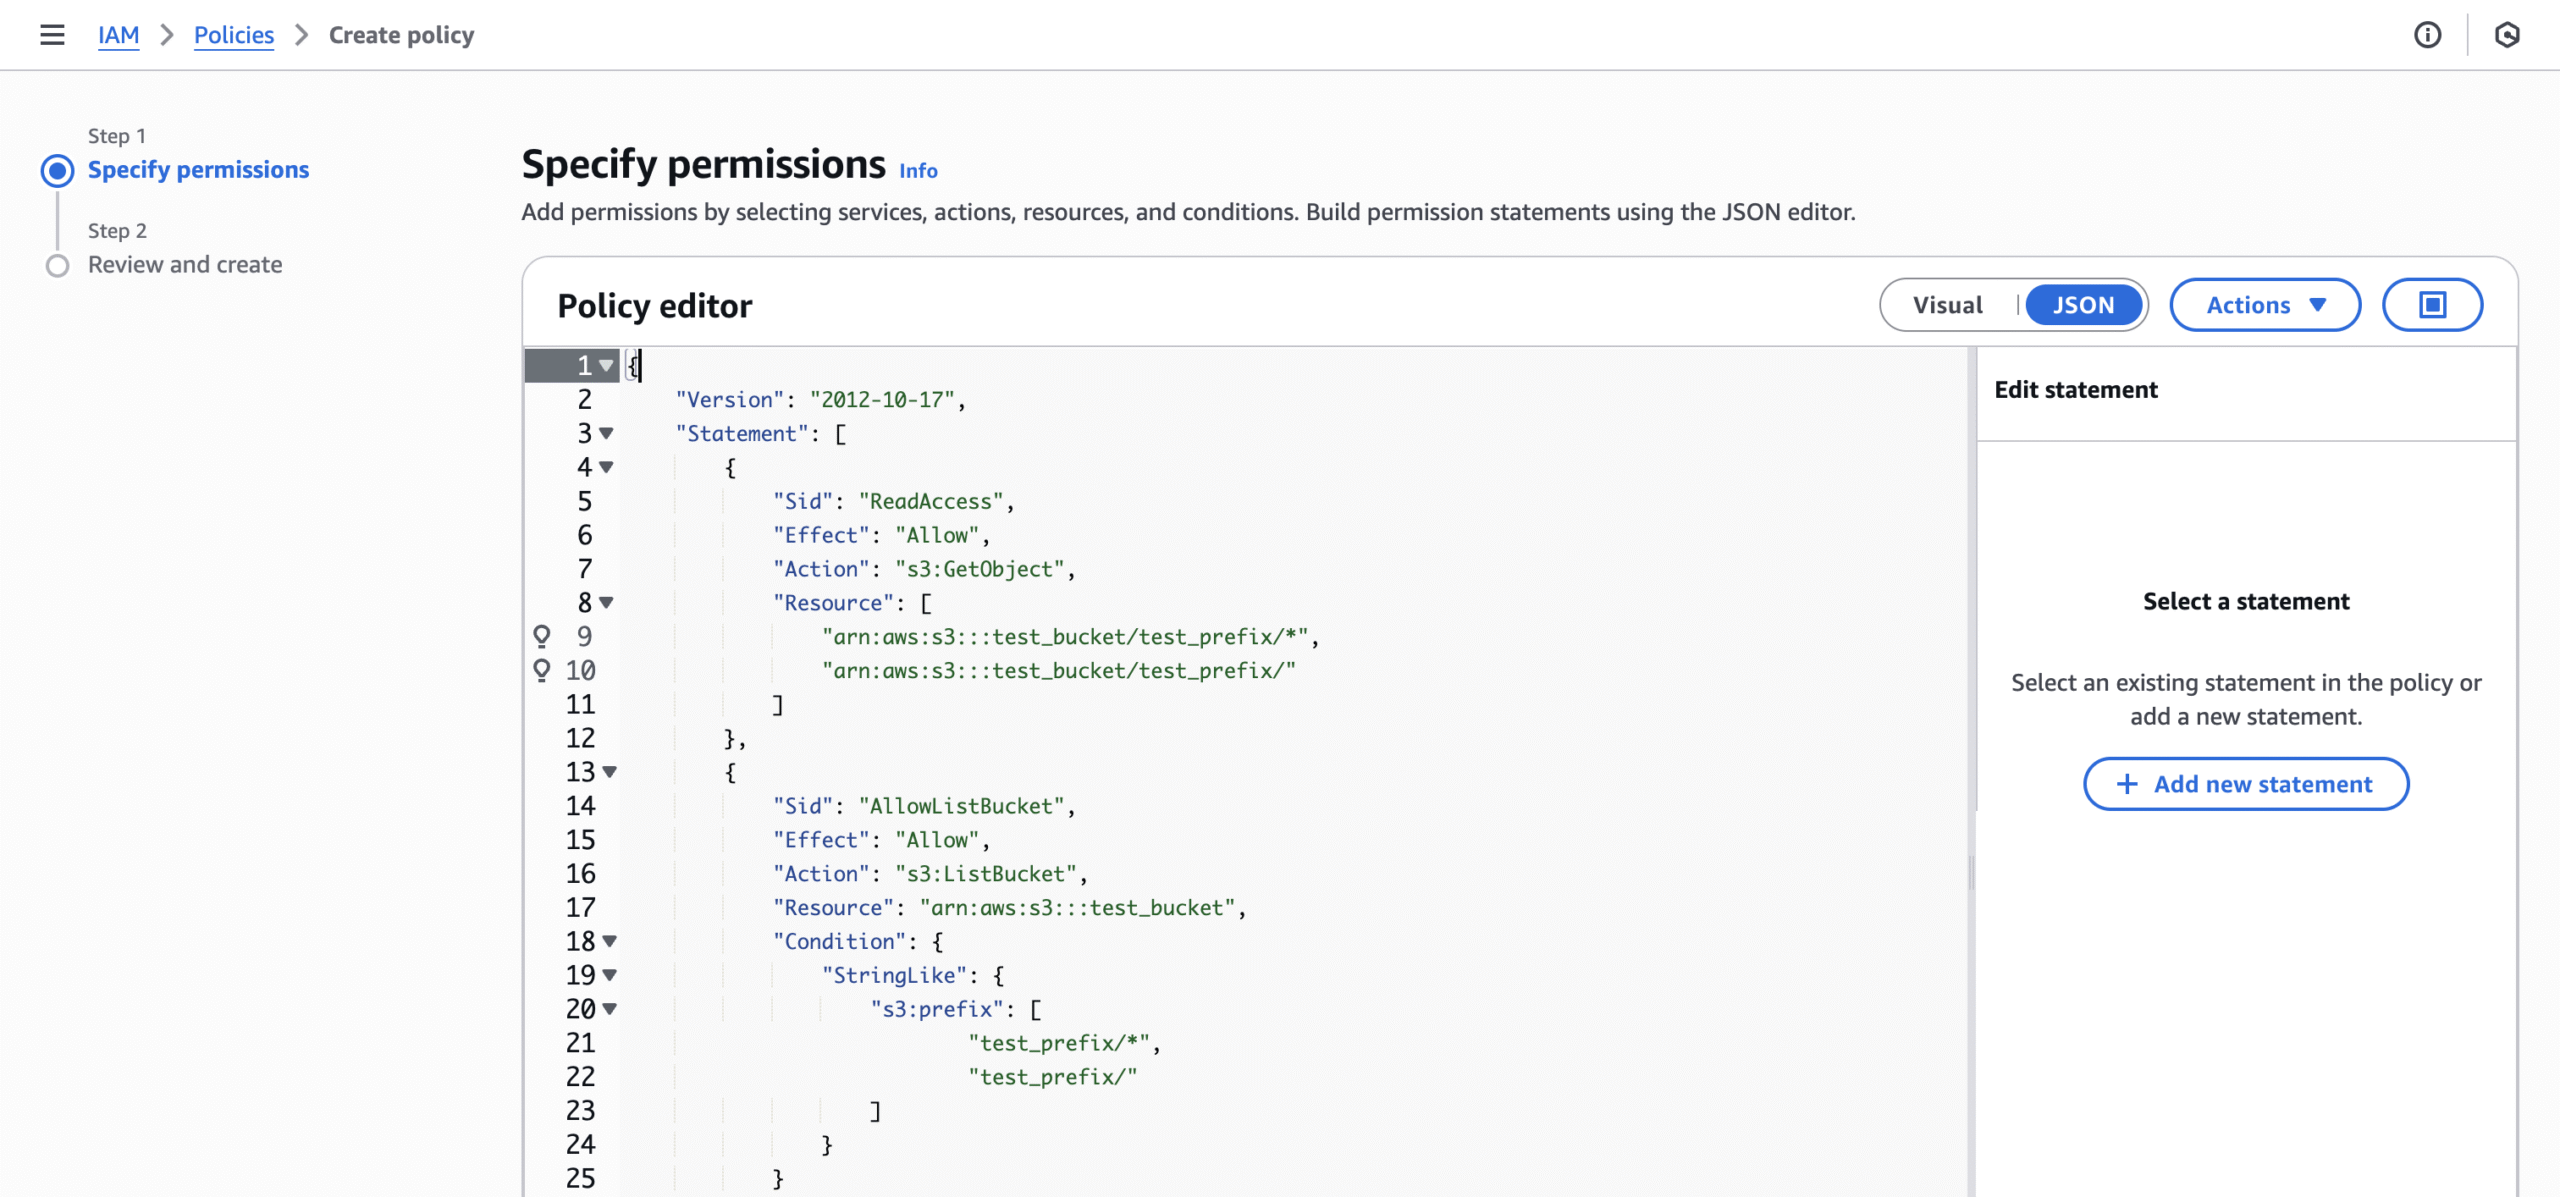
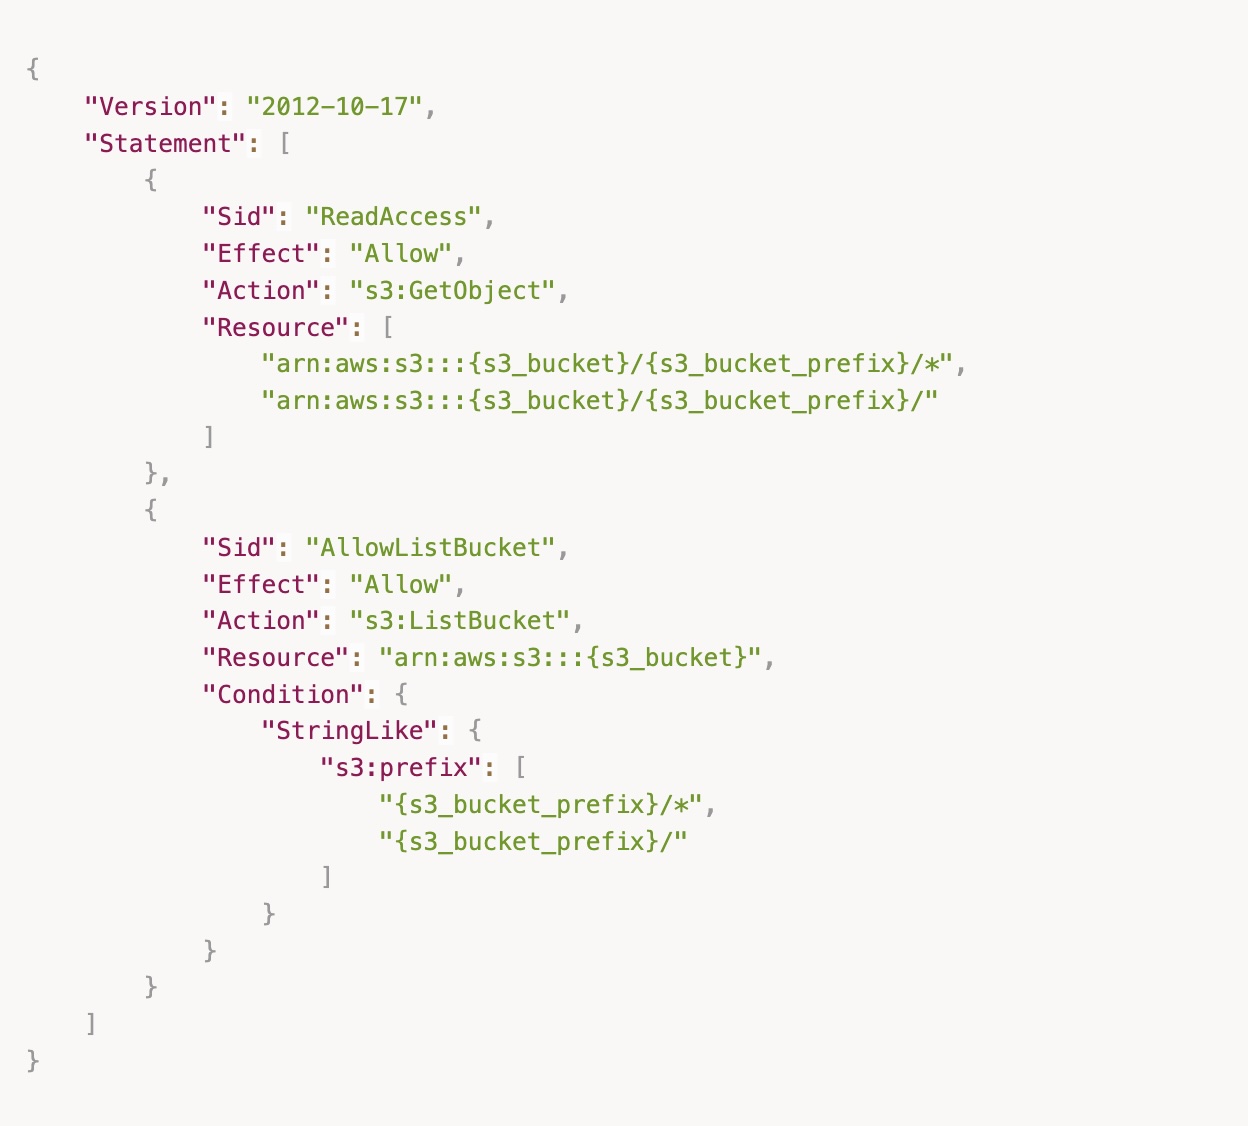
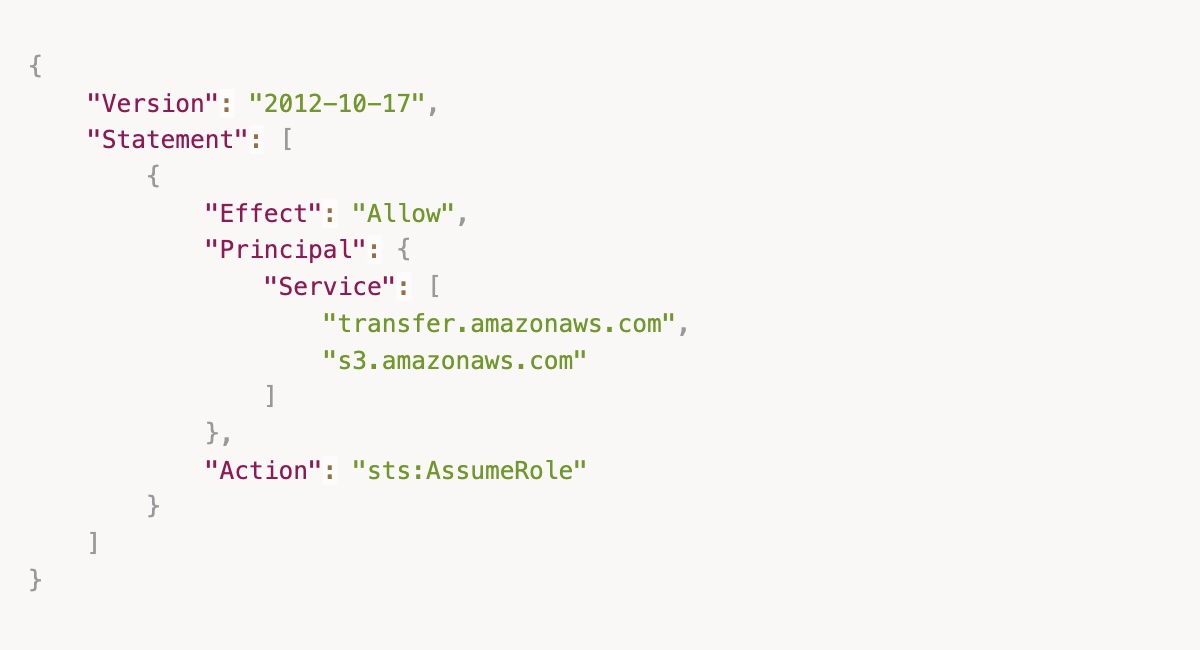
- Create an S3 bucket policy. Within IAM, create a policy that is based on this template. The JSON is below as well. If you are transferring all contents within a bucket, then specifying the bucket prefix is not necessary.
Why did we limit the IAM user to a single bucket?
We configured a dedicated IAM user with read and list permissions limited to a single bucket, adhering to least-privilege security practices.
- Create an IAM role that inherits the above policy:
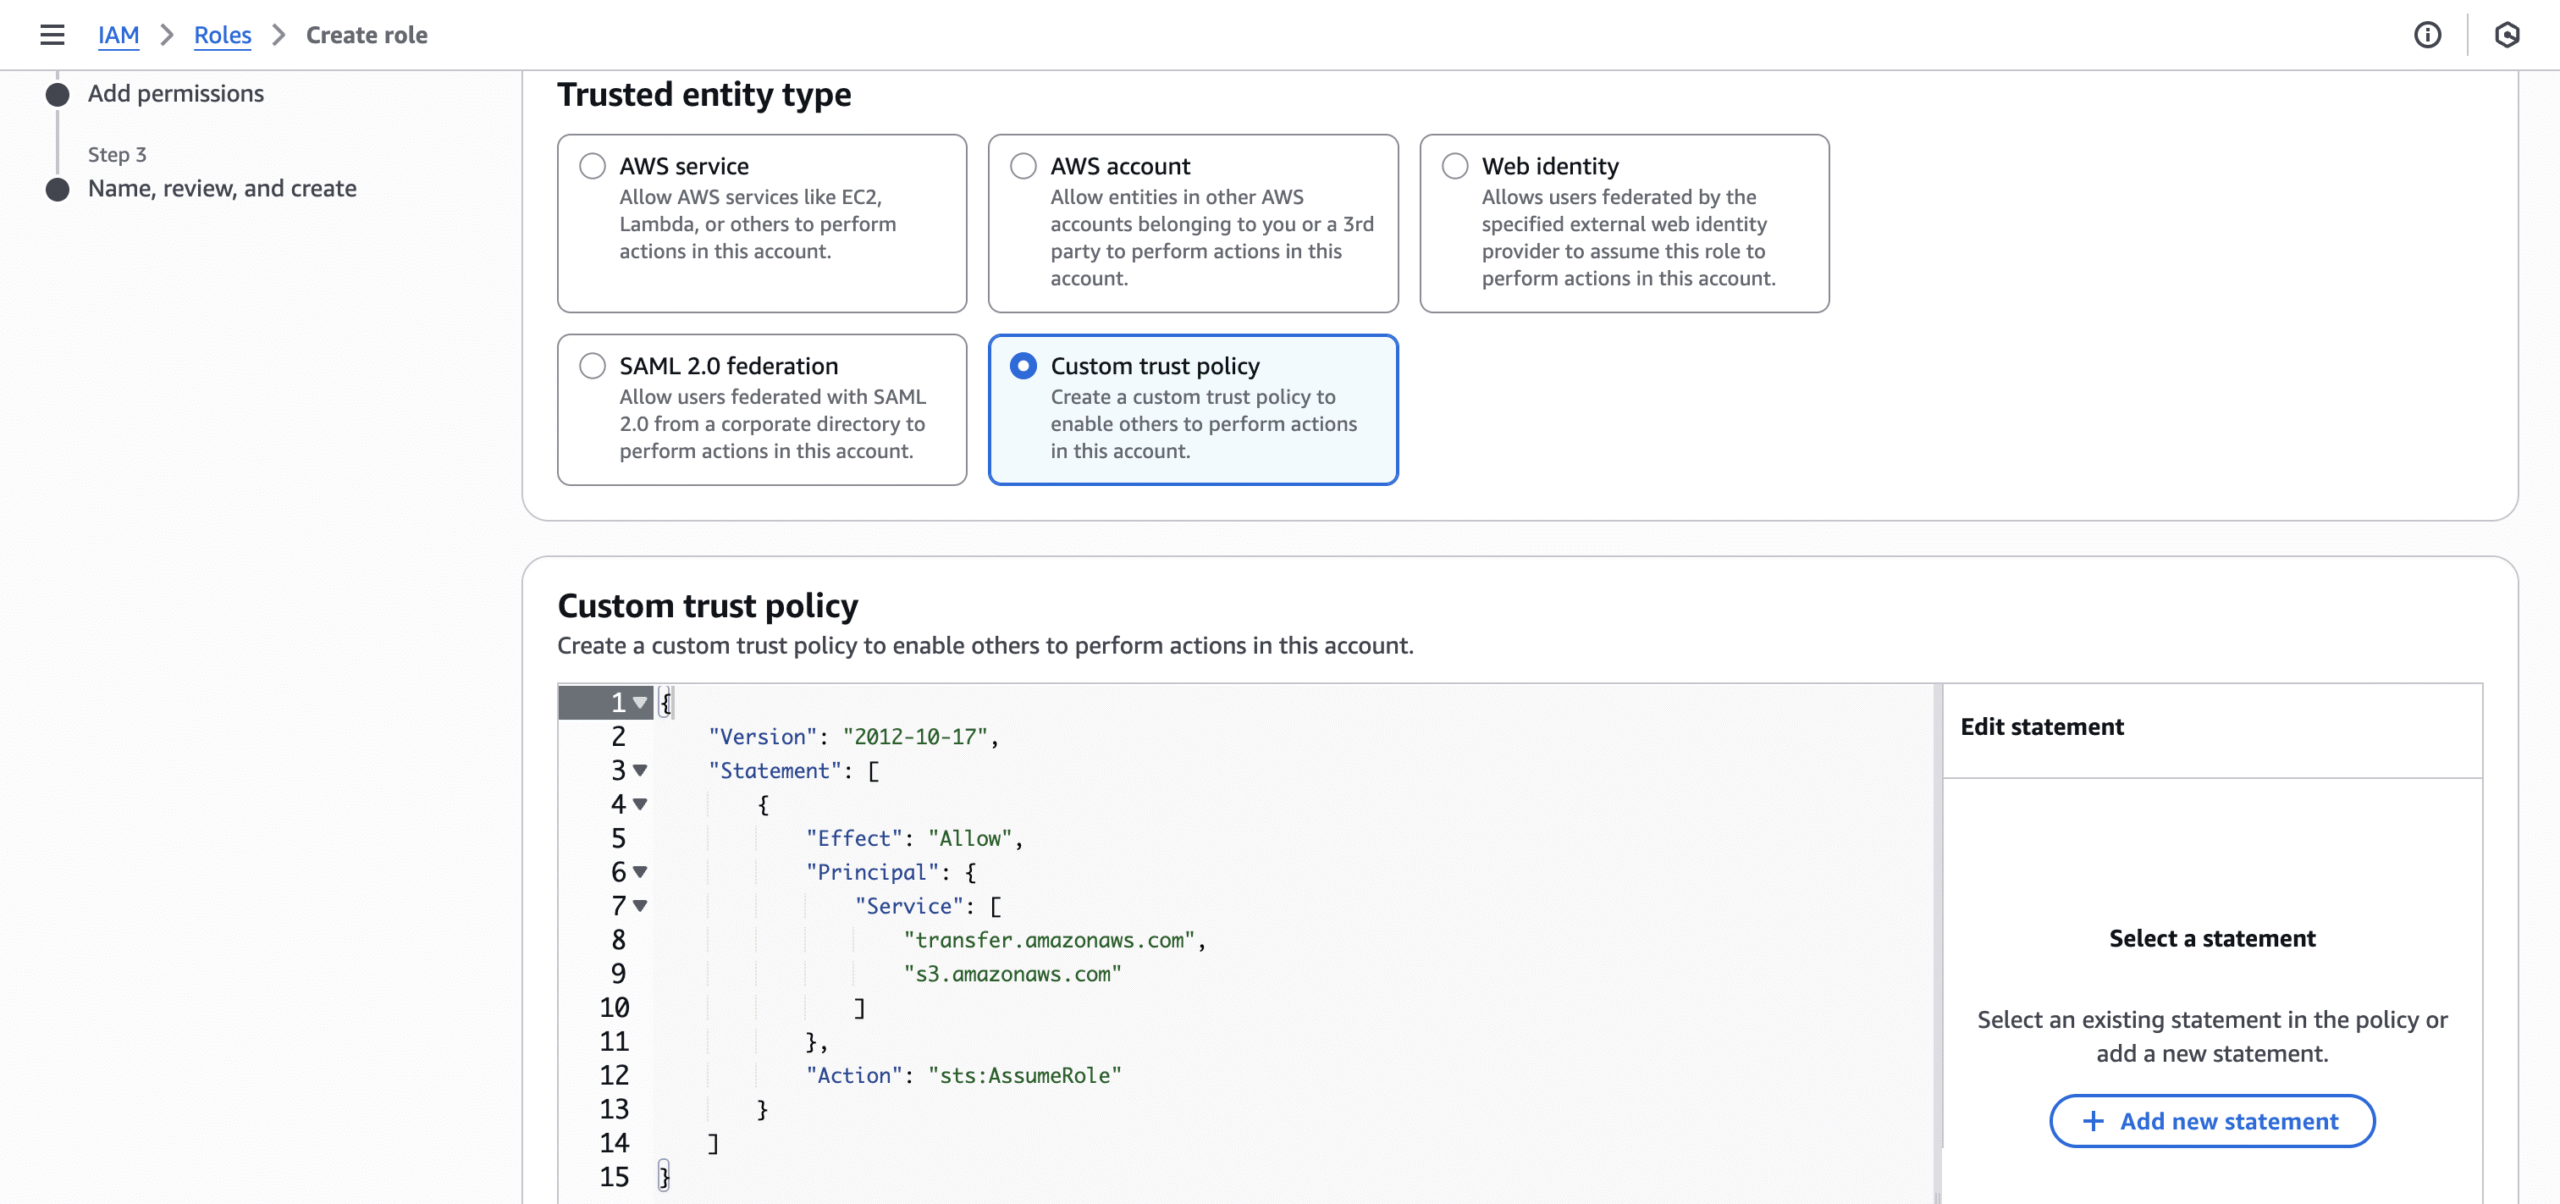
- Step 1: Select “Custom trust policy” for entity type, then enter in the JSON below. Instead of selecting “AWS service” and selecting the entity type, you should create a custom trust policy, which allows the usage of both Transfer Family and S3.
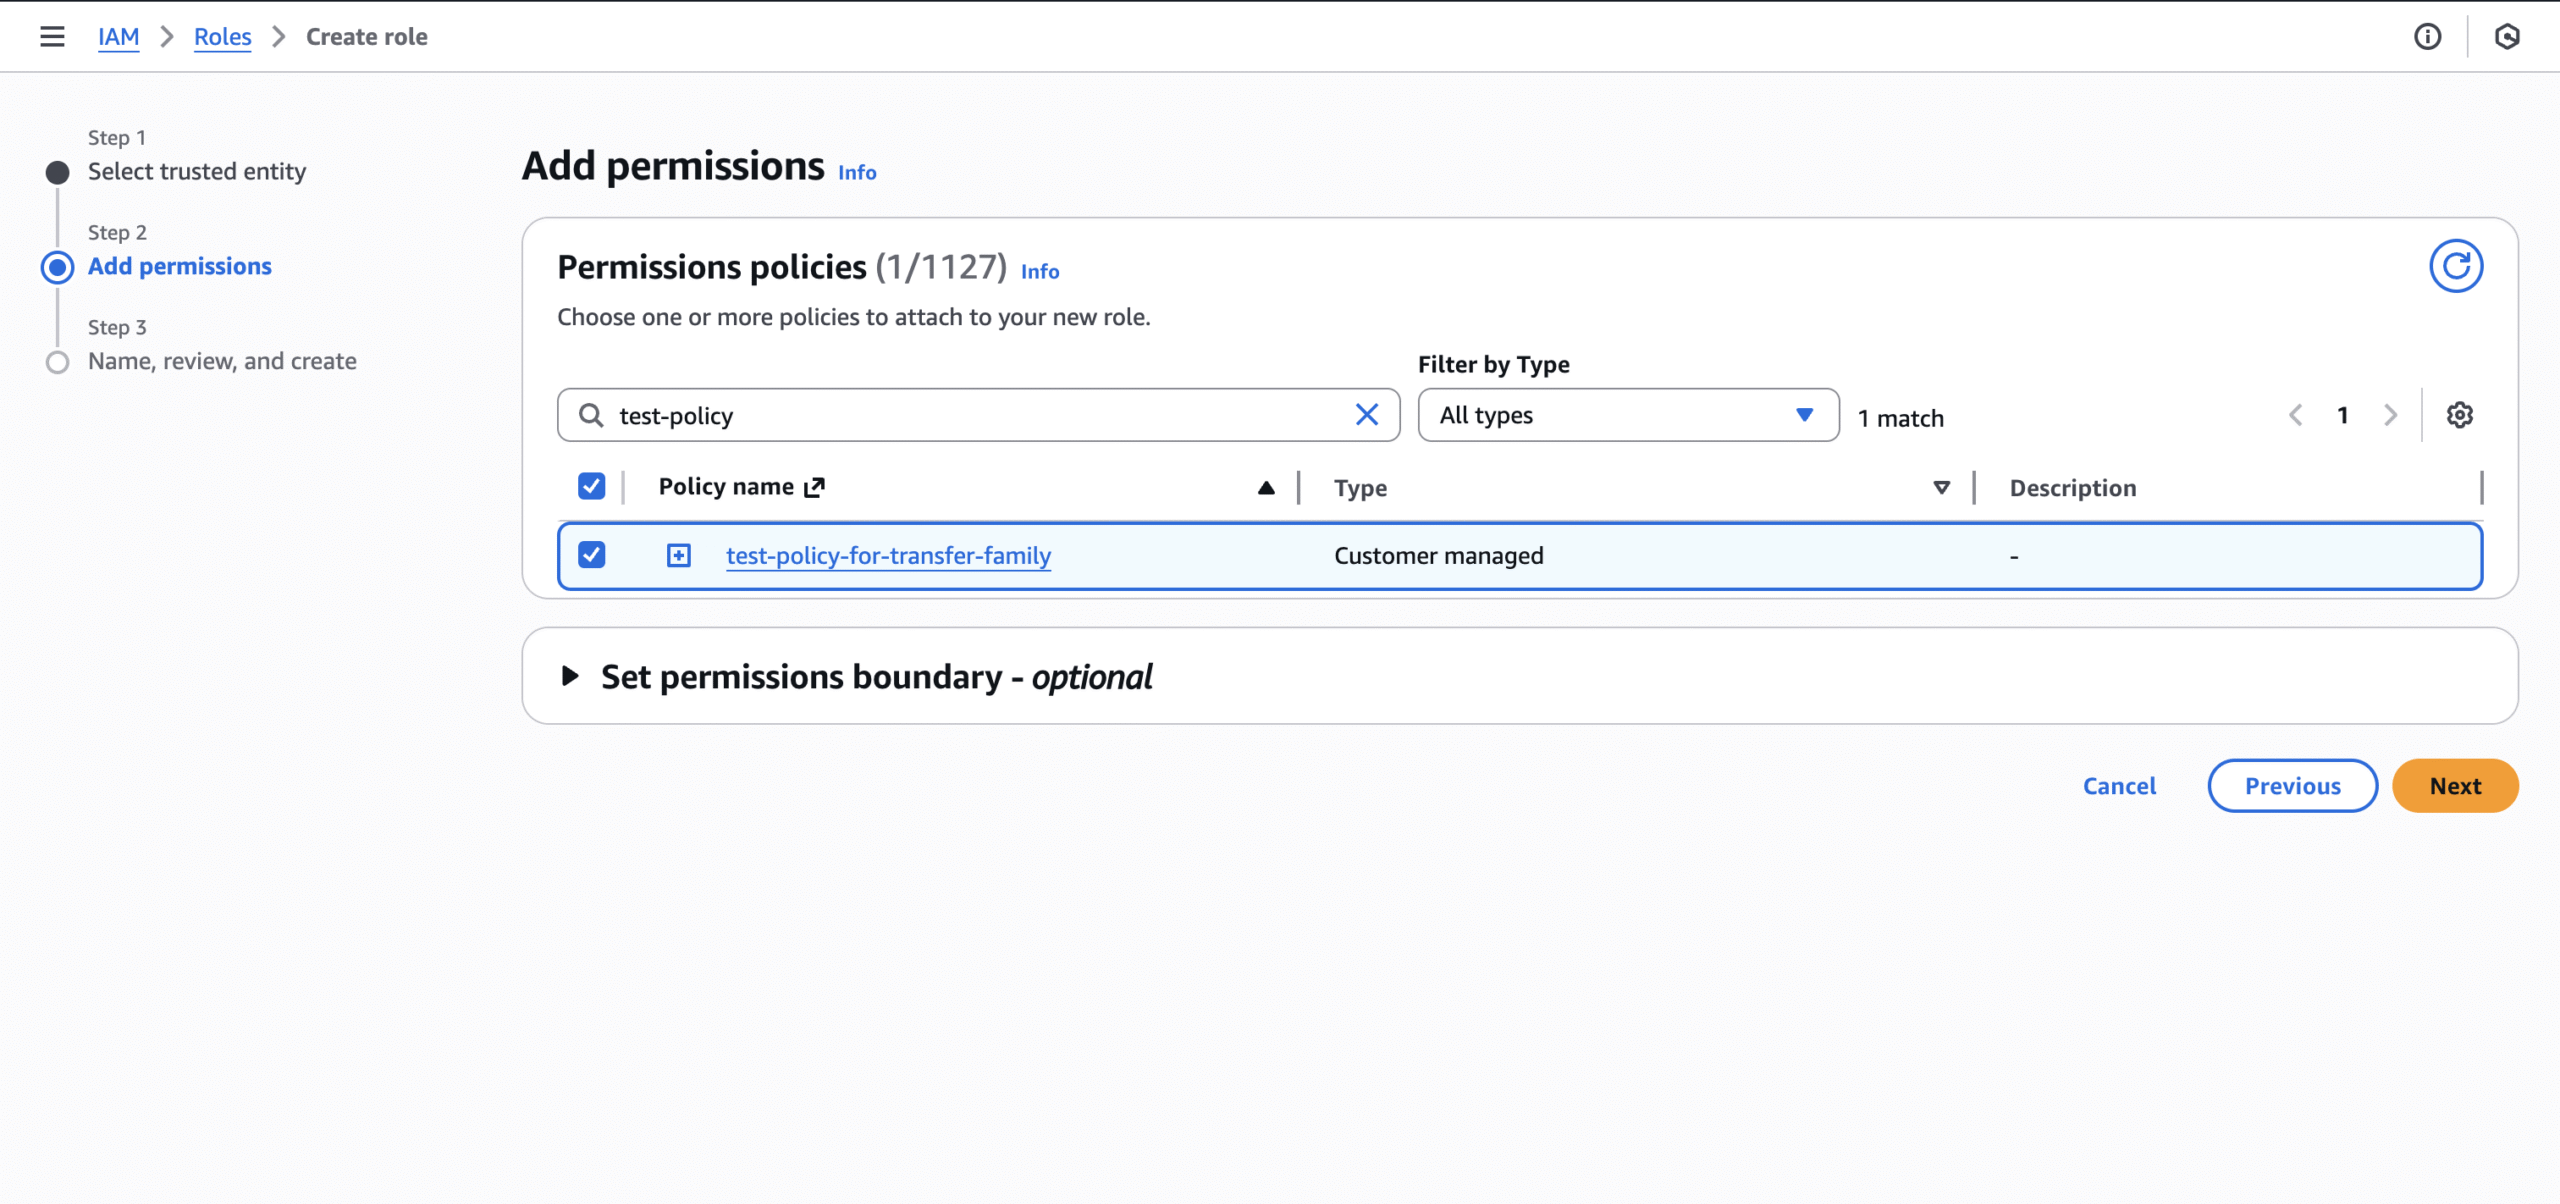
- Step 2: Find and select the policy you just created prior.
- Step 3: Enter the role name and then create the role.
- Step 1: Select “Custom trust policy” for entity type, then enter in the JSON below. Instead of selecting “AWS service” and selecting the entity type, you should create a custom trust policy, which allows the usage of both Transfer Family and S3.
Generate the SSH Key Pair
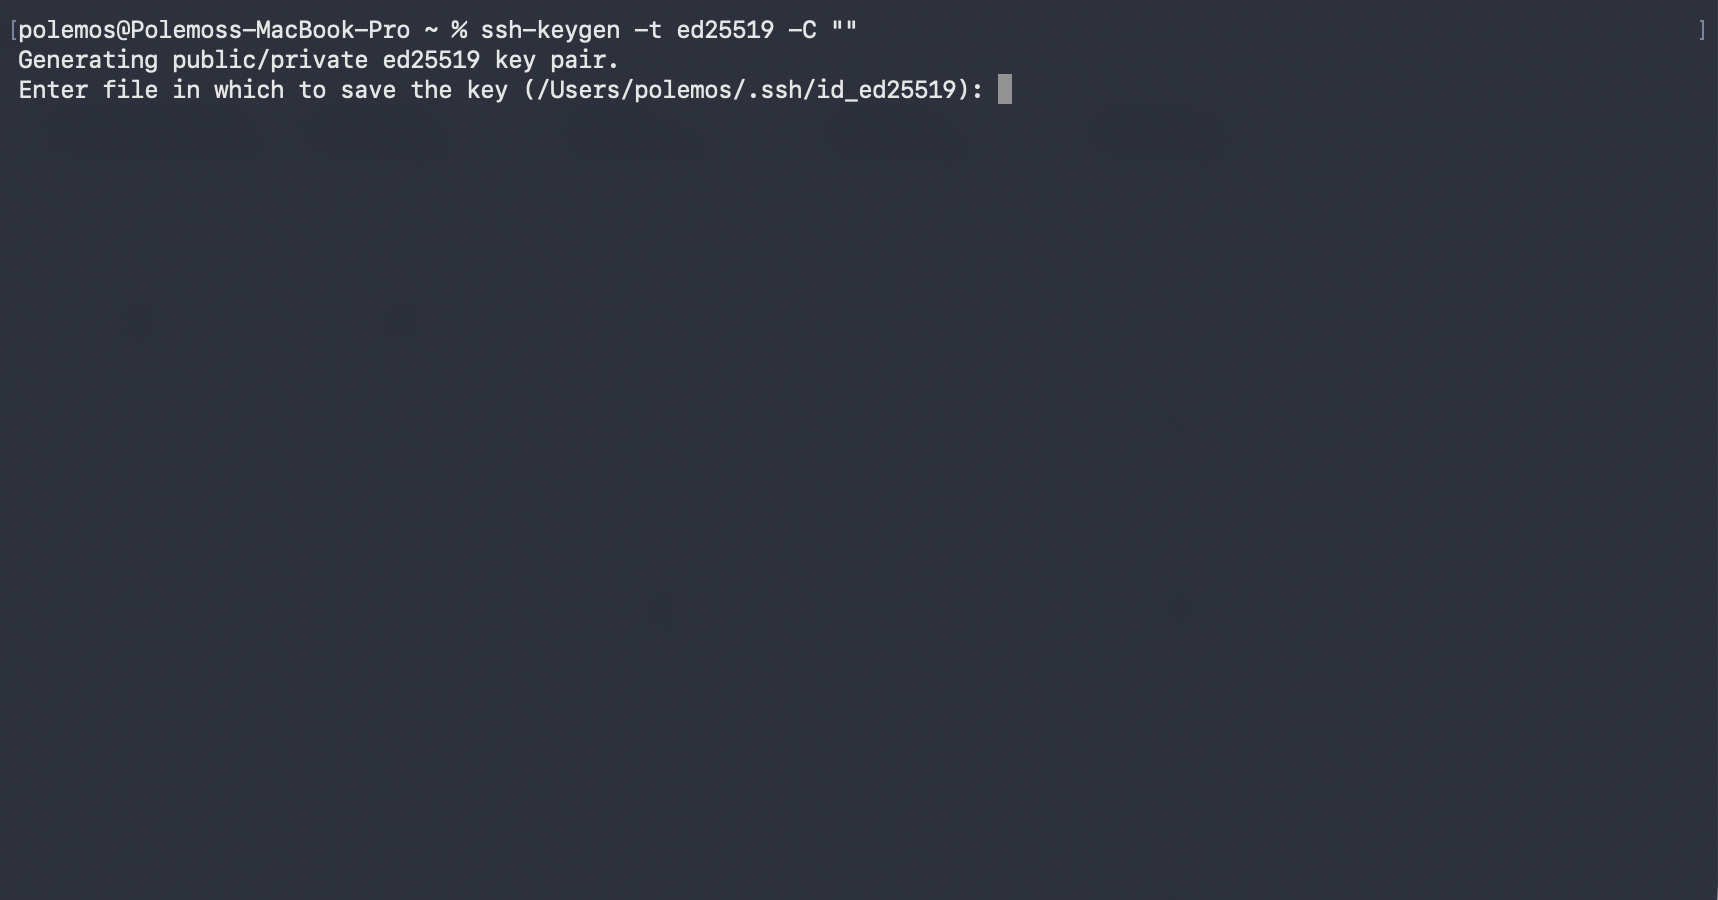
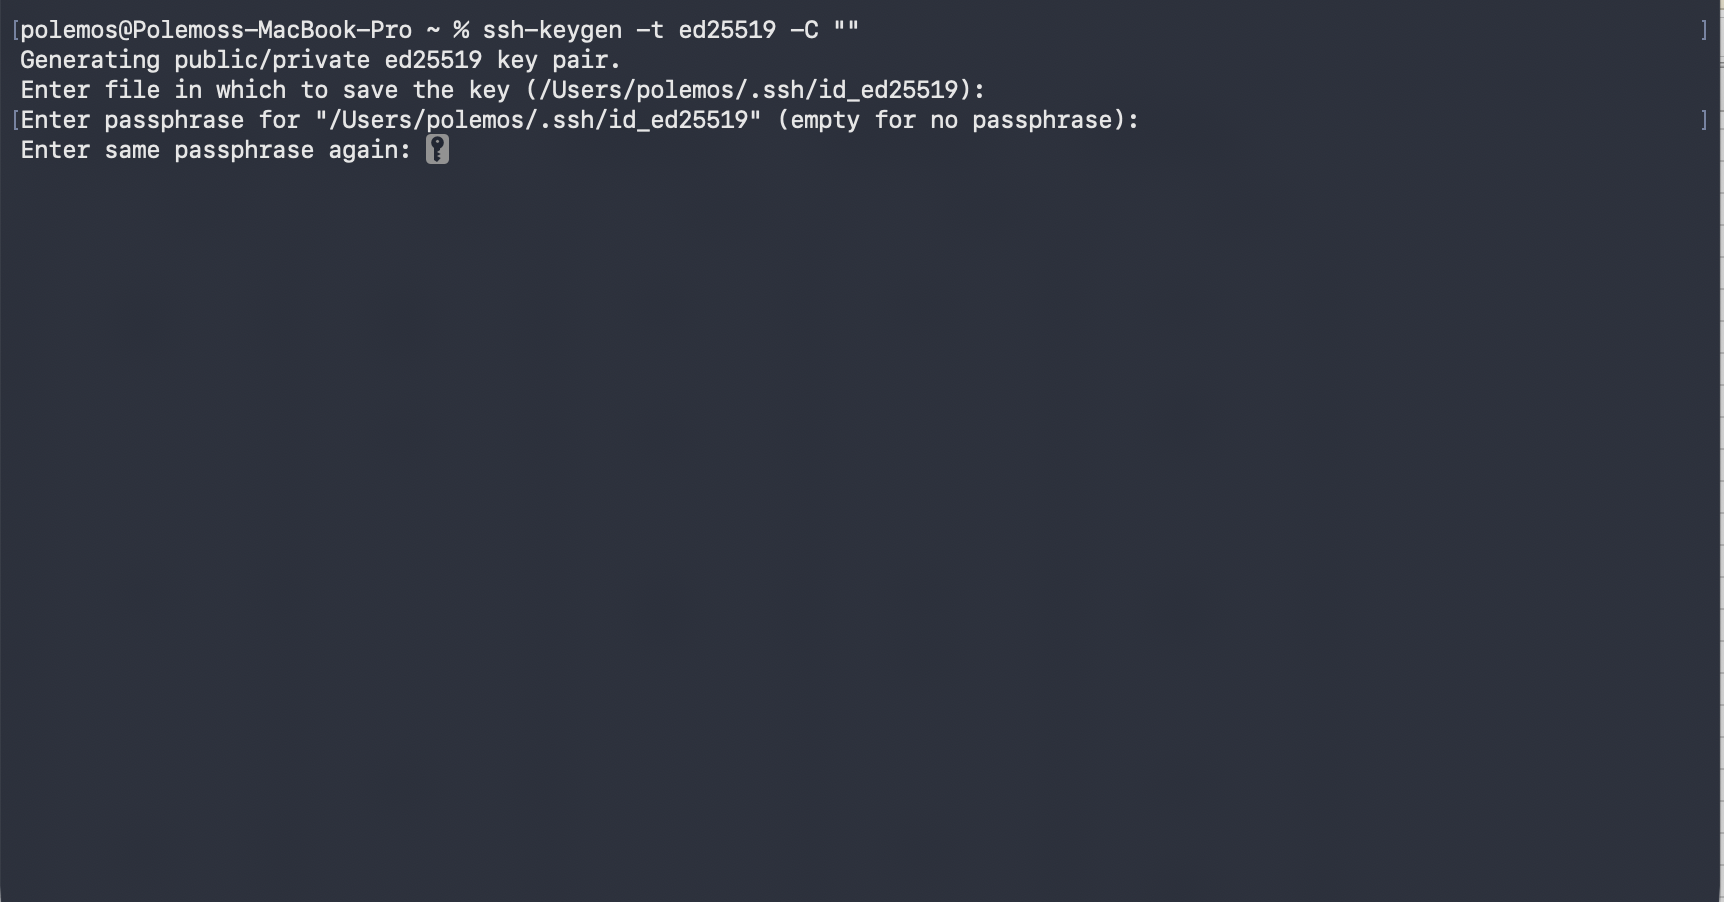
- Next, you need to create a SSH key pair for the new SFTP user. In your terminal / IDE do ssh-keygen -t ed25519 -C “”
- It will ask for a specific file path; hit Enter unless this needs to change.
- It will then ask for a passphrase. For this guide, we will hit enter twice not to attach a passphrase.
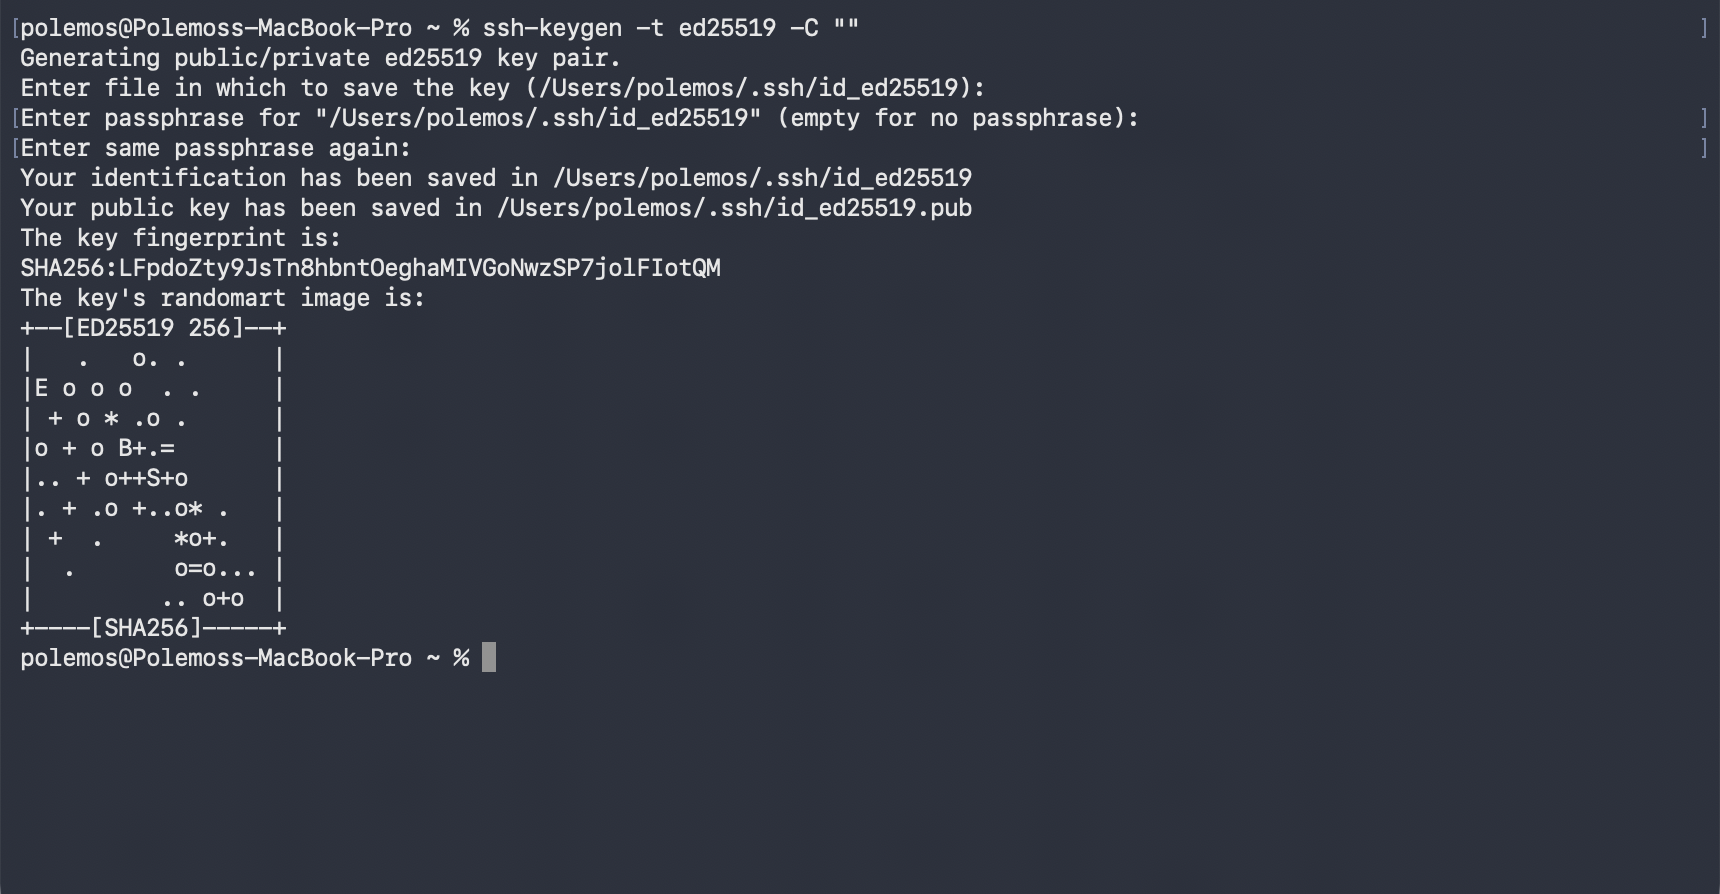
- If done correctly, you will see the fingerprint and randomart. If you are on MacOS, the key will be stored in the .ssh/ folder. [YO1] [KB2] By default, id_ed25519 will be the private key and id_ed25519.pub will be the public key.
- It will ask for a specific file path; hit Enter unless this needs to change.
- For Windows, please refer to this page.
Why did we choose ed25519 SSH keys?
We chose ed25519 SSH keys over RSA for their combination of enhanced security and faster performance.
Create the SFTP User
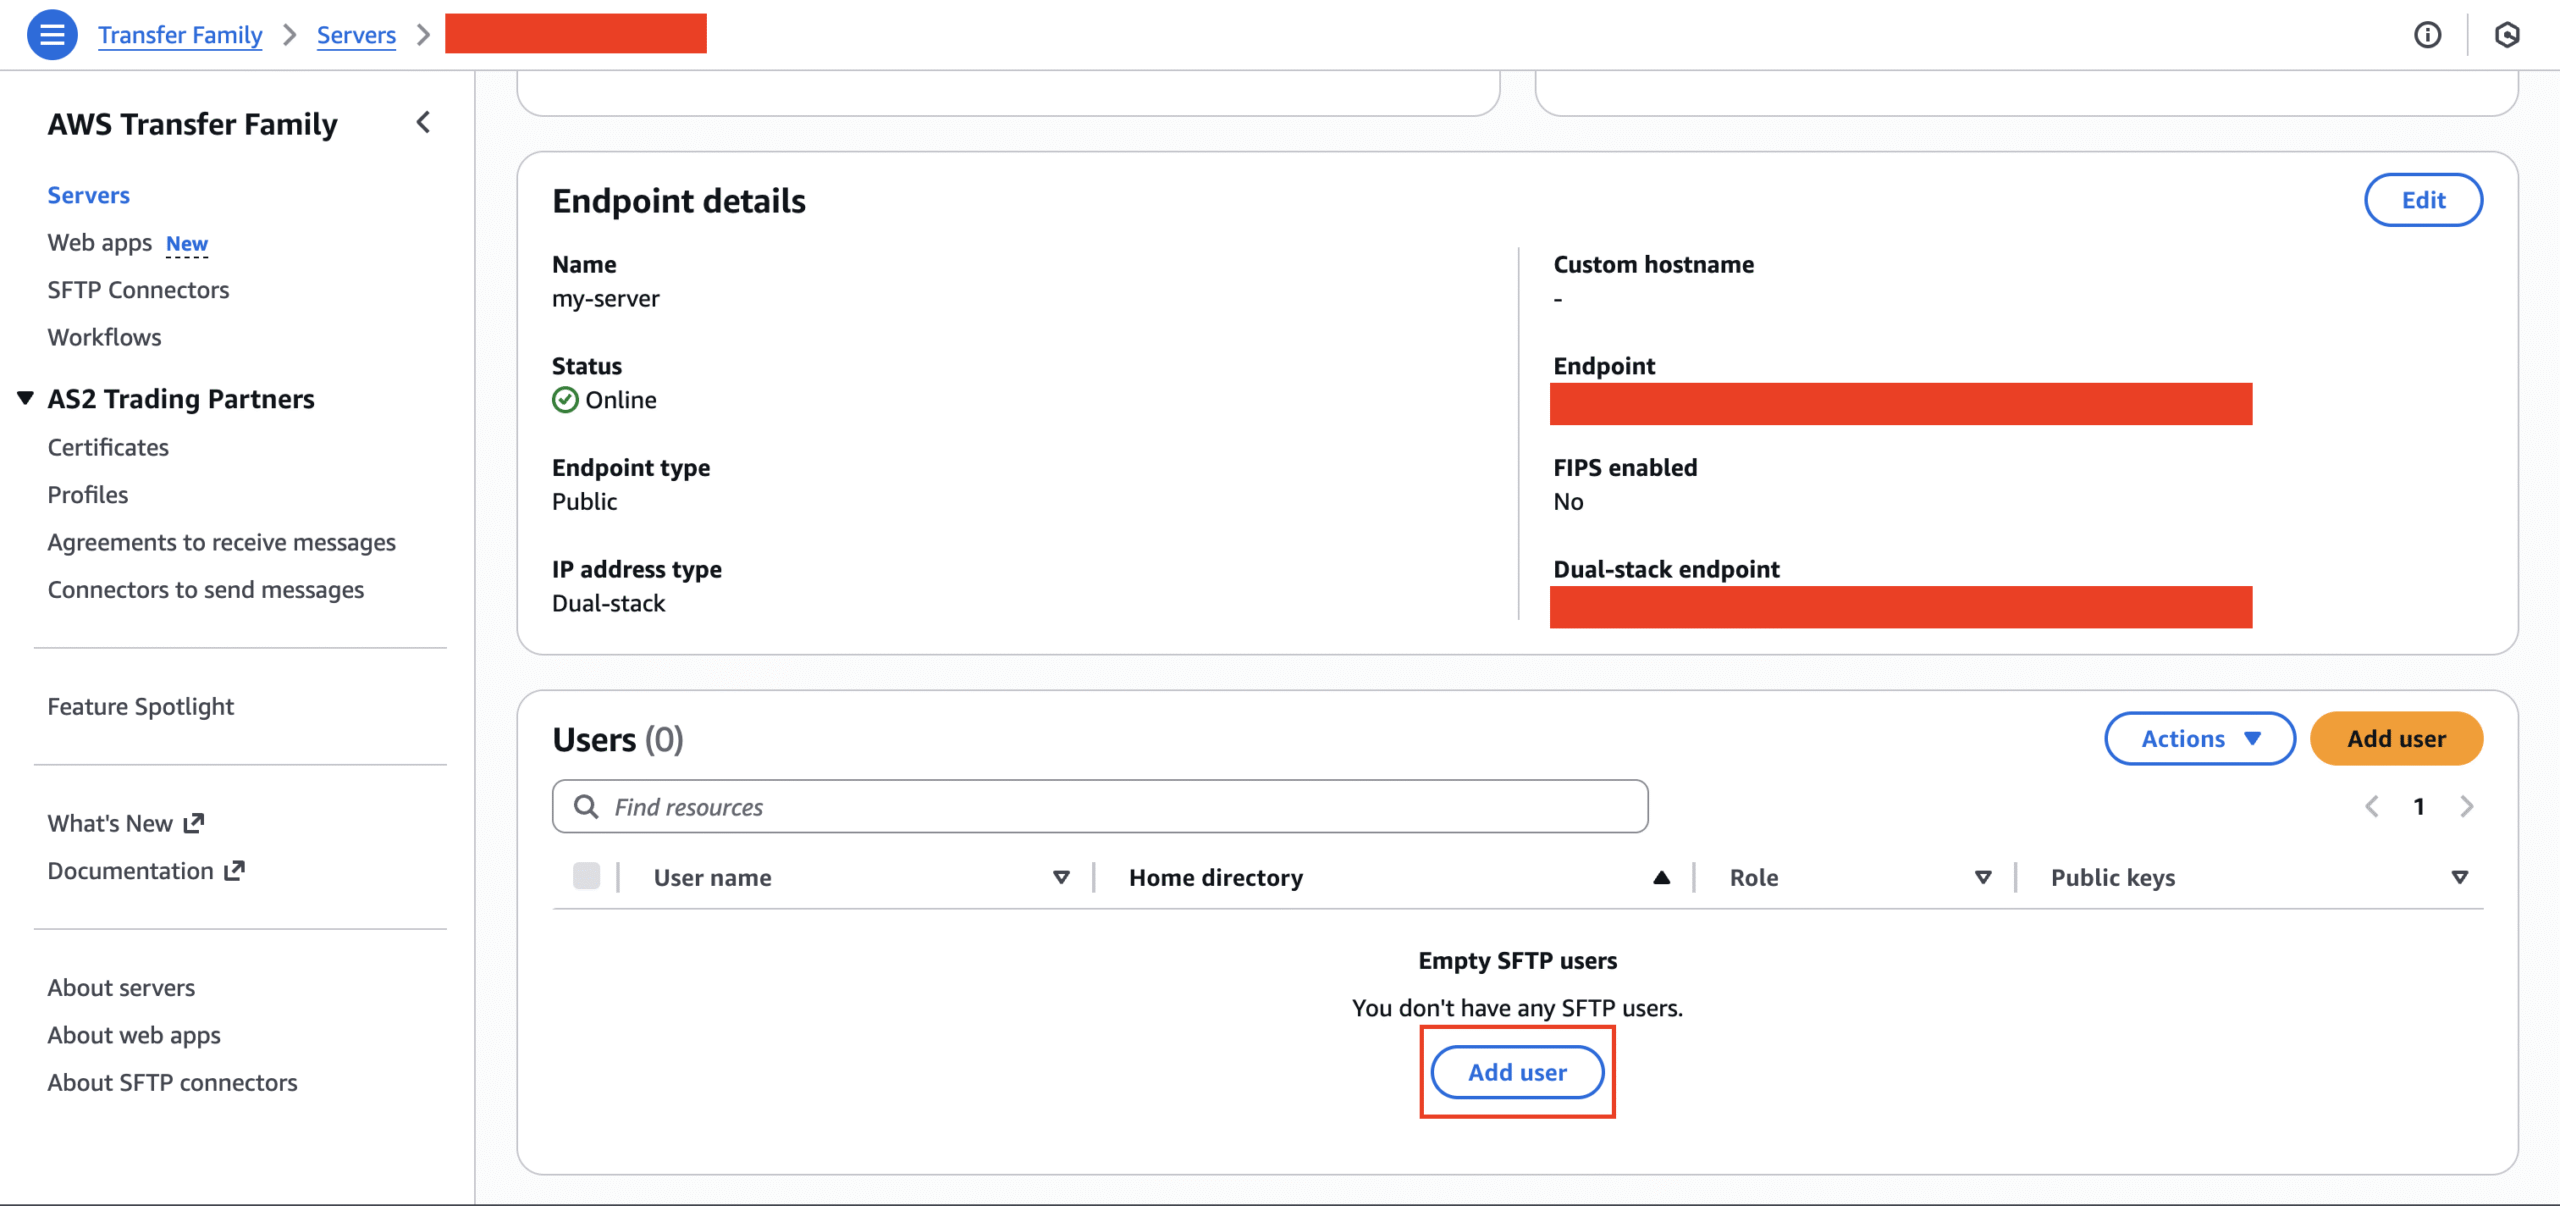
- Return to Transfer Family and select your server. Now, you should select “Add user.”
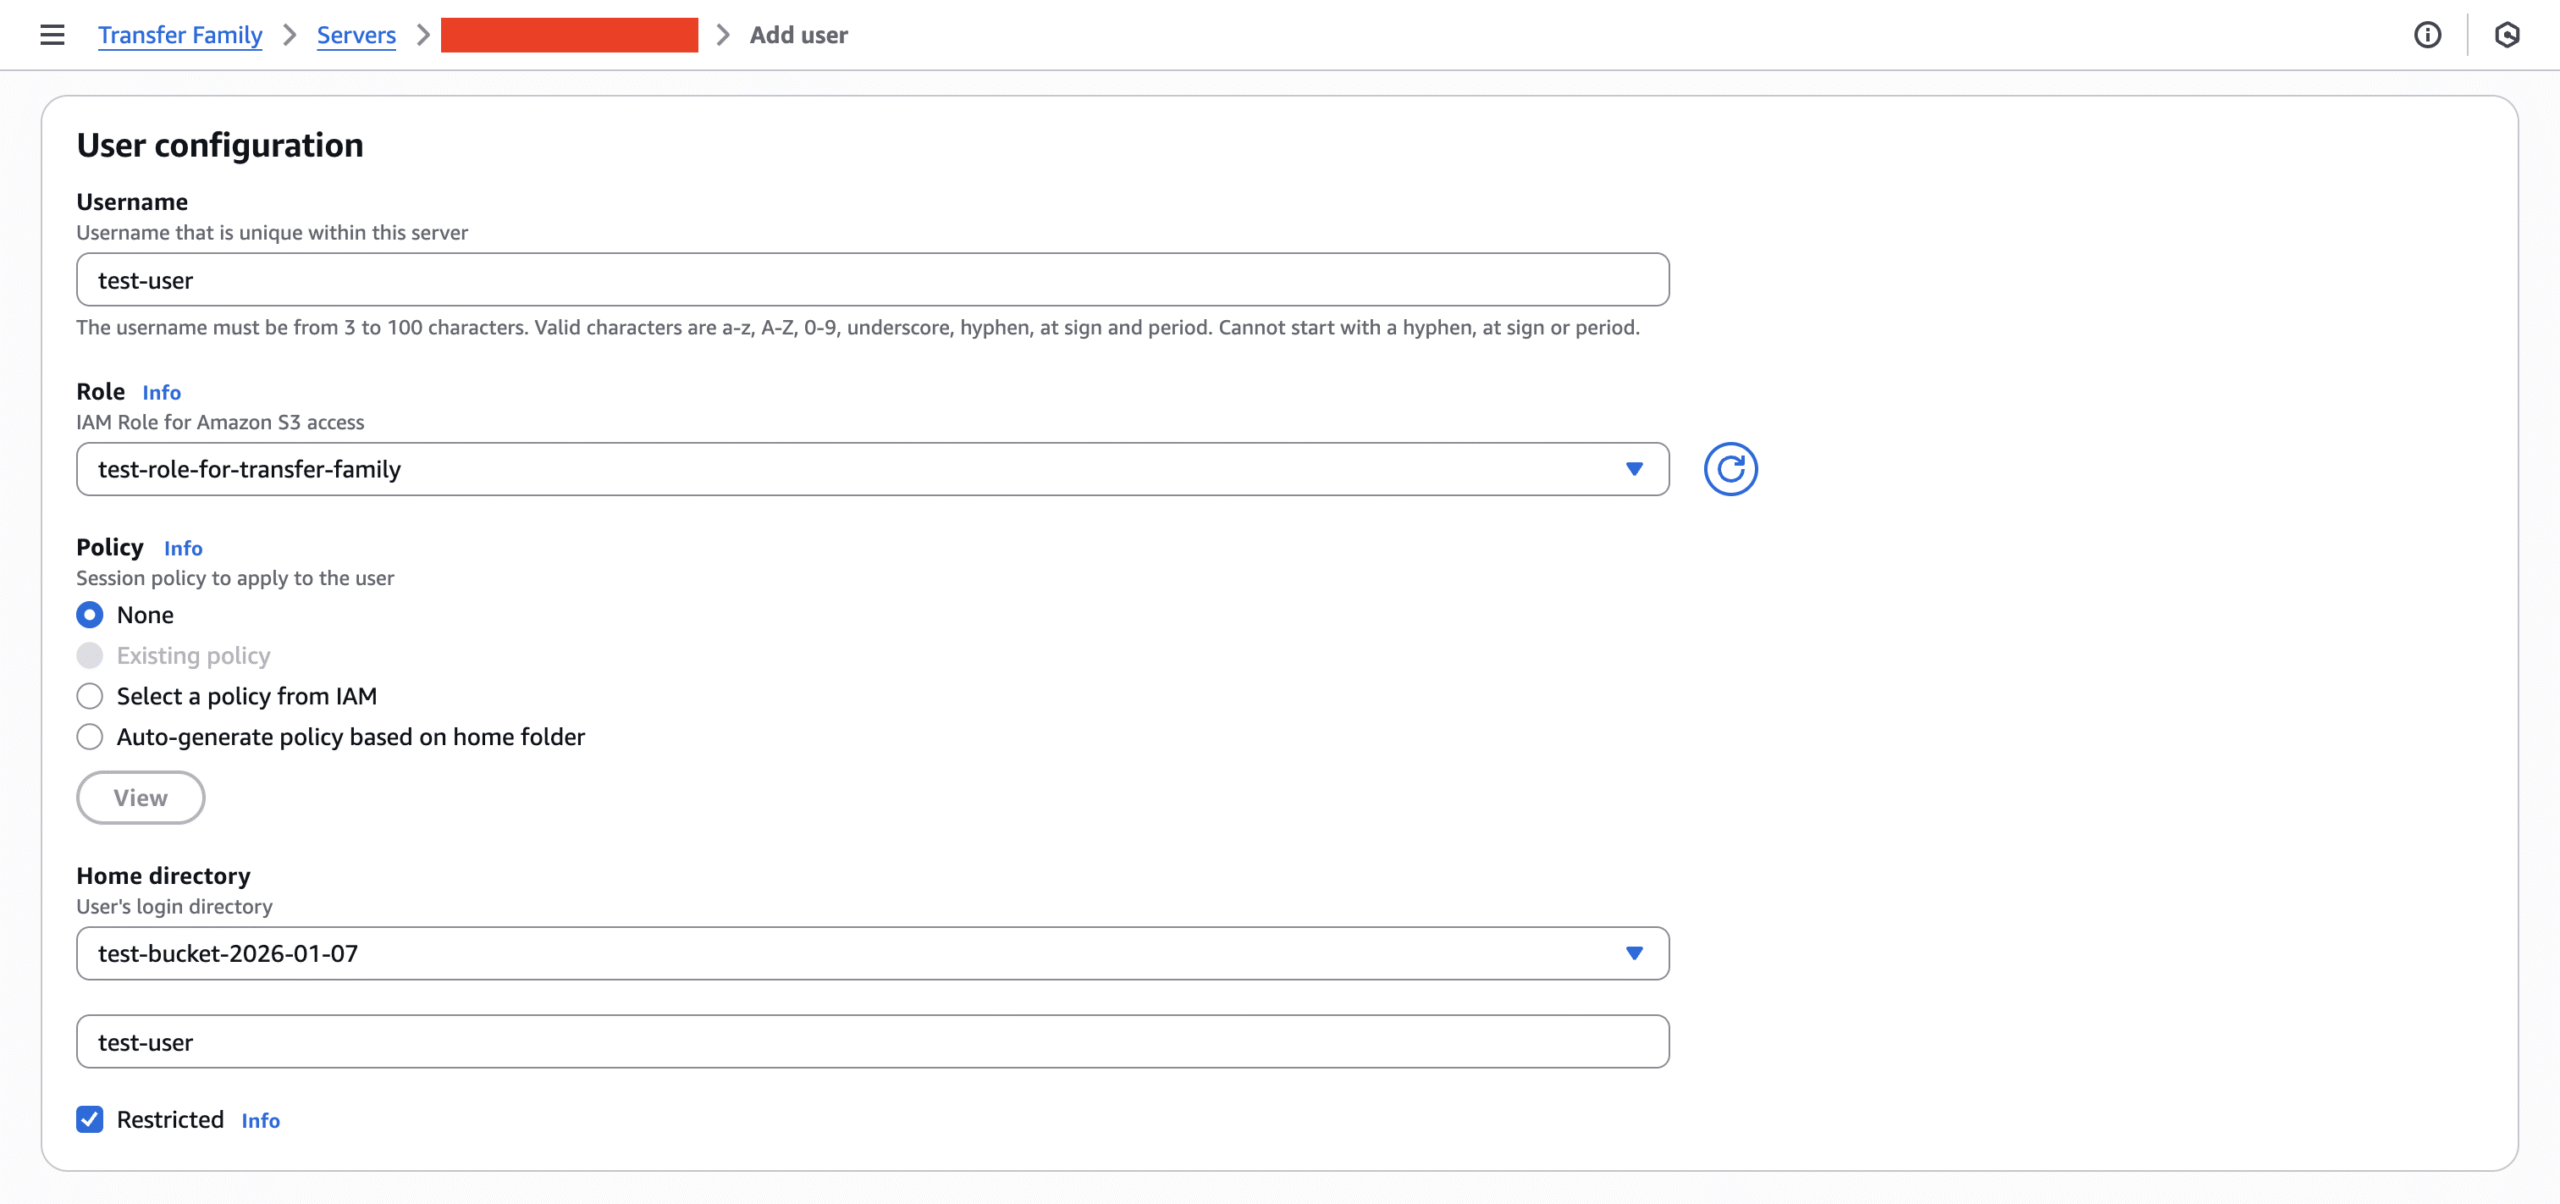
- Provide the username and select their role.
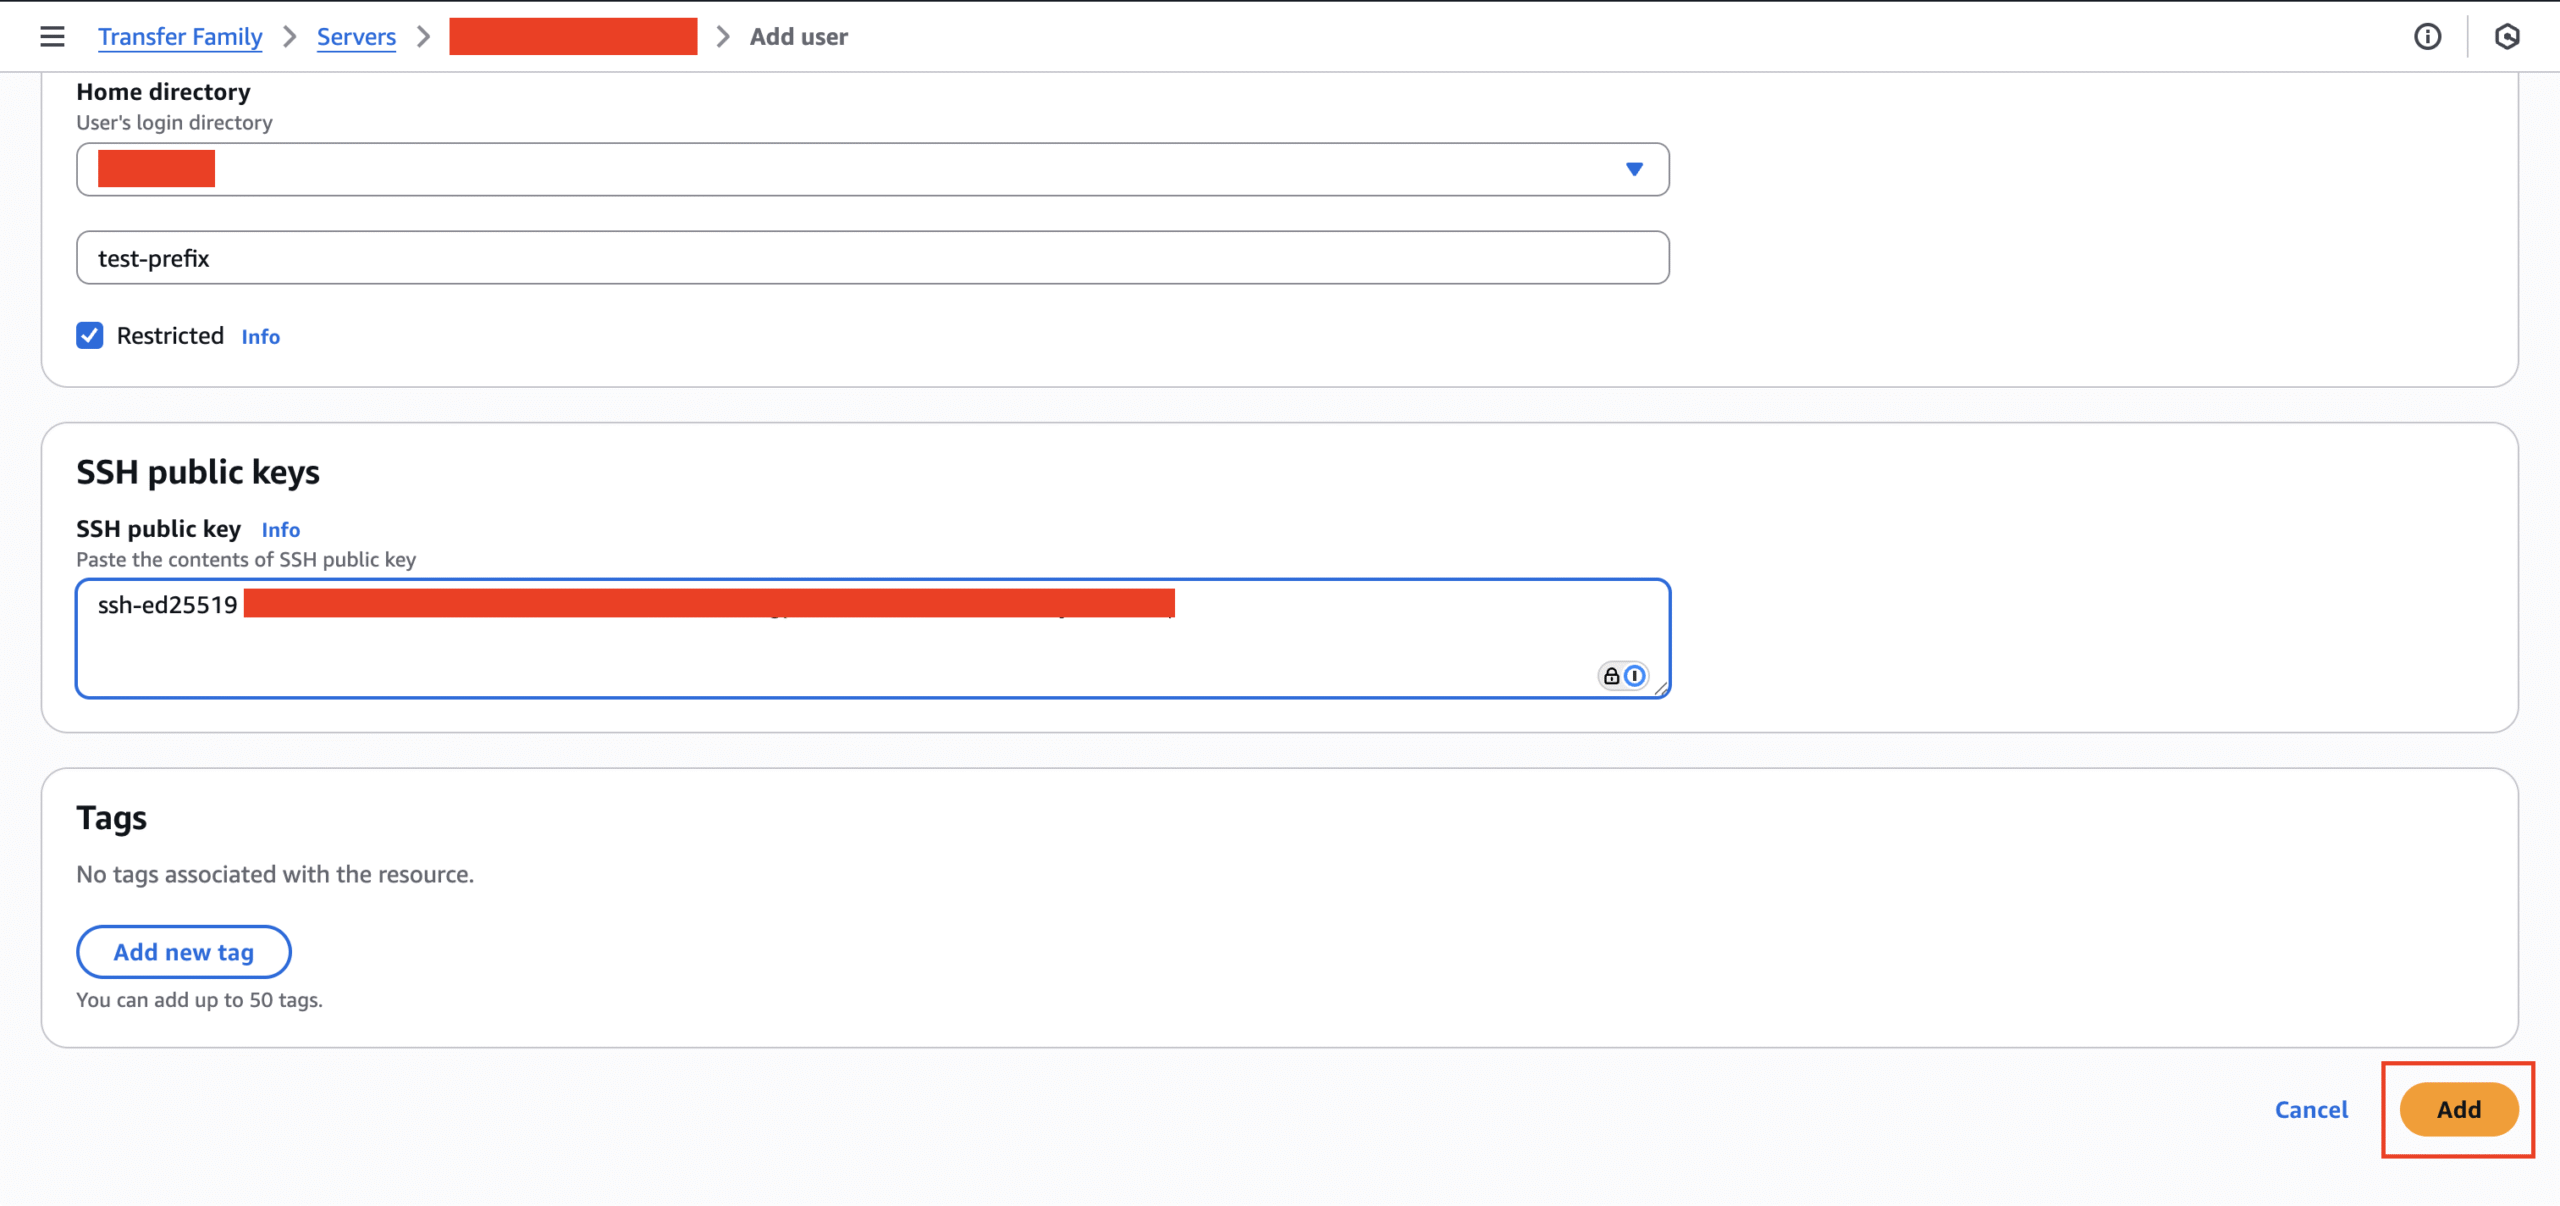
- For Home directory, select the S3 bucket. You will be asked for optional folder. Enter in the S3 bucket prefix to ensure least-necessary access.
- This means when they get access, they will immediately see the folders/files starting at the prefix.
- Make sure the “Restricted” check box is selected.
- From AWS: “Users will not be able to access anything outside of that folder, nor will they be able to see the S3 bucket or folder name.”
- Optional: Assign a user-specific policy. If multiple users share the same role but need access to different parts of the bucket, you can assign individual IAM policies to control their access.
- Enter in the entire content from the generated public key into the SSH public key text input, then click on “Add.”
- You should be able to see the created user now. End users will need this username and the generated private key to connect to the S3 bucket.
Usage Instructions
Only SFTP transfer clients or the usage of sftp through the terminal will work for the transfer to occur. SSH terminal connections will not work in our use case. Follow these instructions to conduct SFTP testing via an appropriate client:
- Perform chmod 600 {private_key_file_path} on the private SSH key as certain clients may not allow you to connect, if they need read privileges on said key.
- Download an SFTP client like Cyberduck or Filezilla. The below instructions are for Cyberduck.
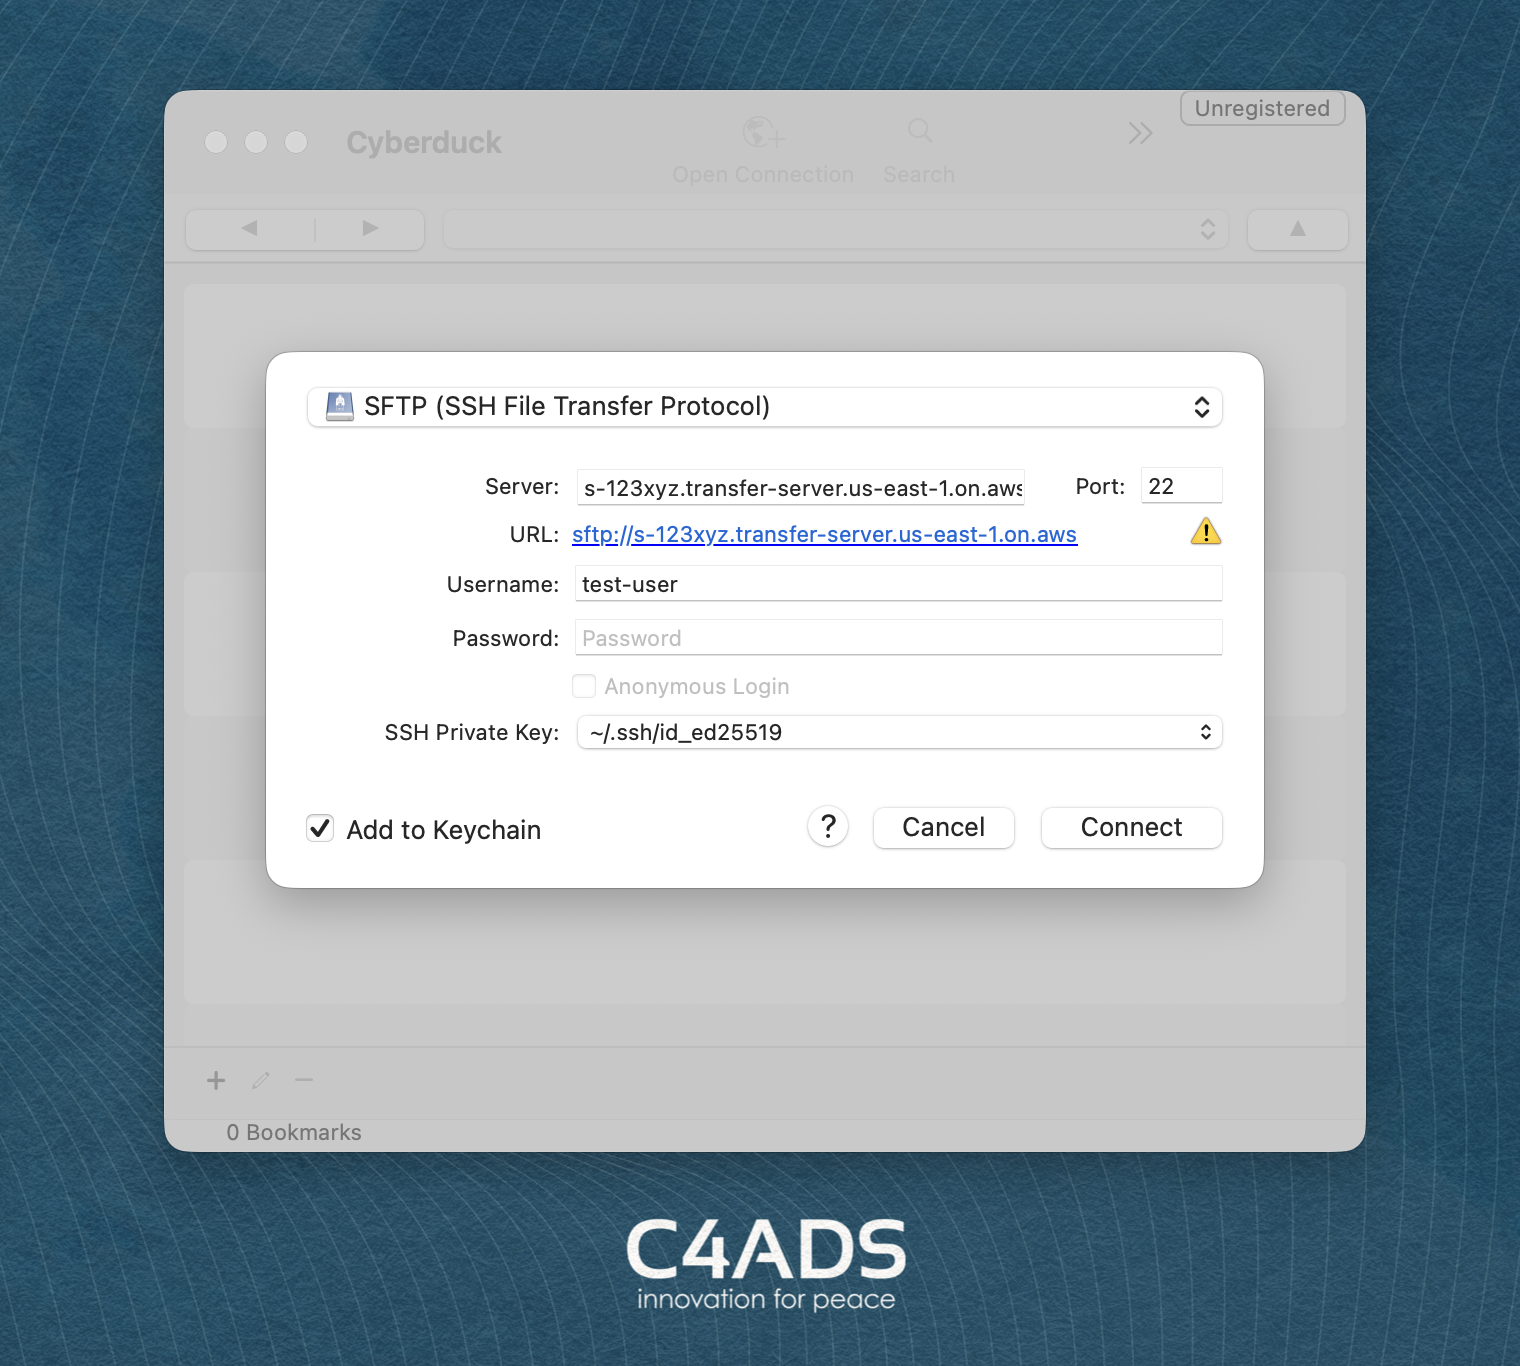
- Select “Open Connection”; a modal will appear.
- In the dropdown menu select SFTP.
- For the server, you should enter in the dual-stack endpoint. It should be in the format of s-123xyz.transfer-server.us-east-1.on.aws
- The port should be 22, if it is not set already.
- Enter in the username.
- Leave password empty.
- For SSH private key, find and select the private key that was just generated, then select “Connect.”
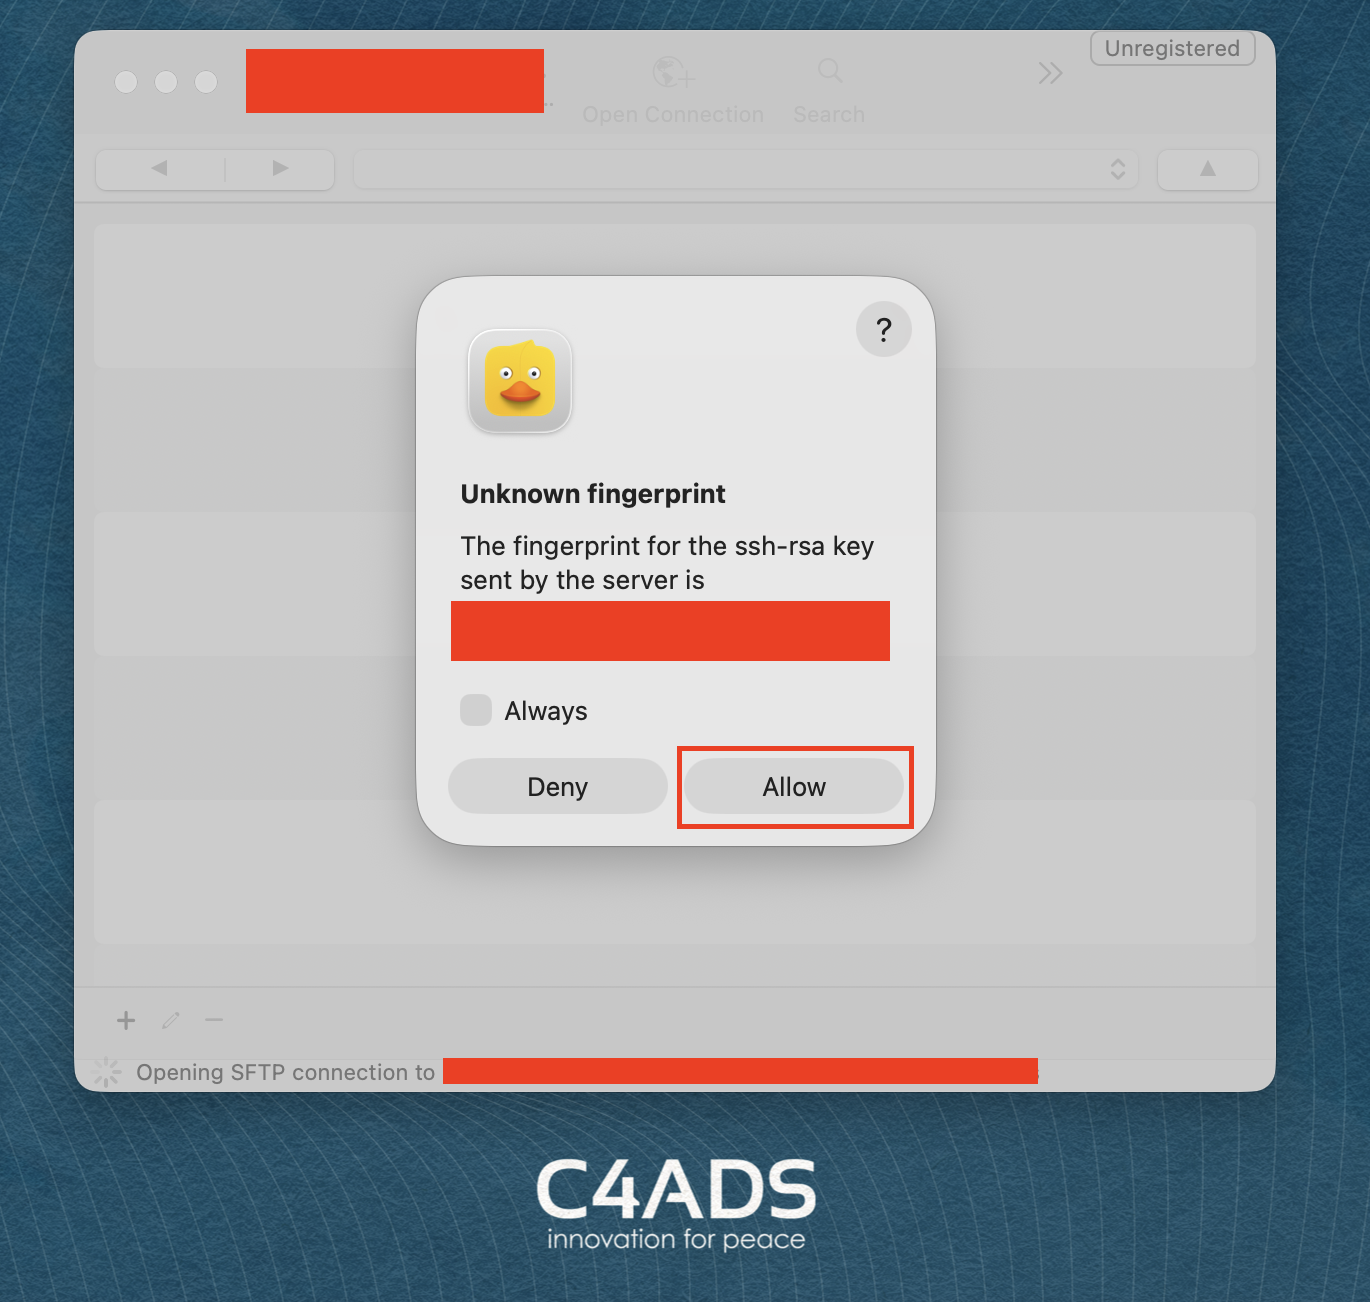
- You might see the message “Unknown fingerprint.” Select “Allow.”
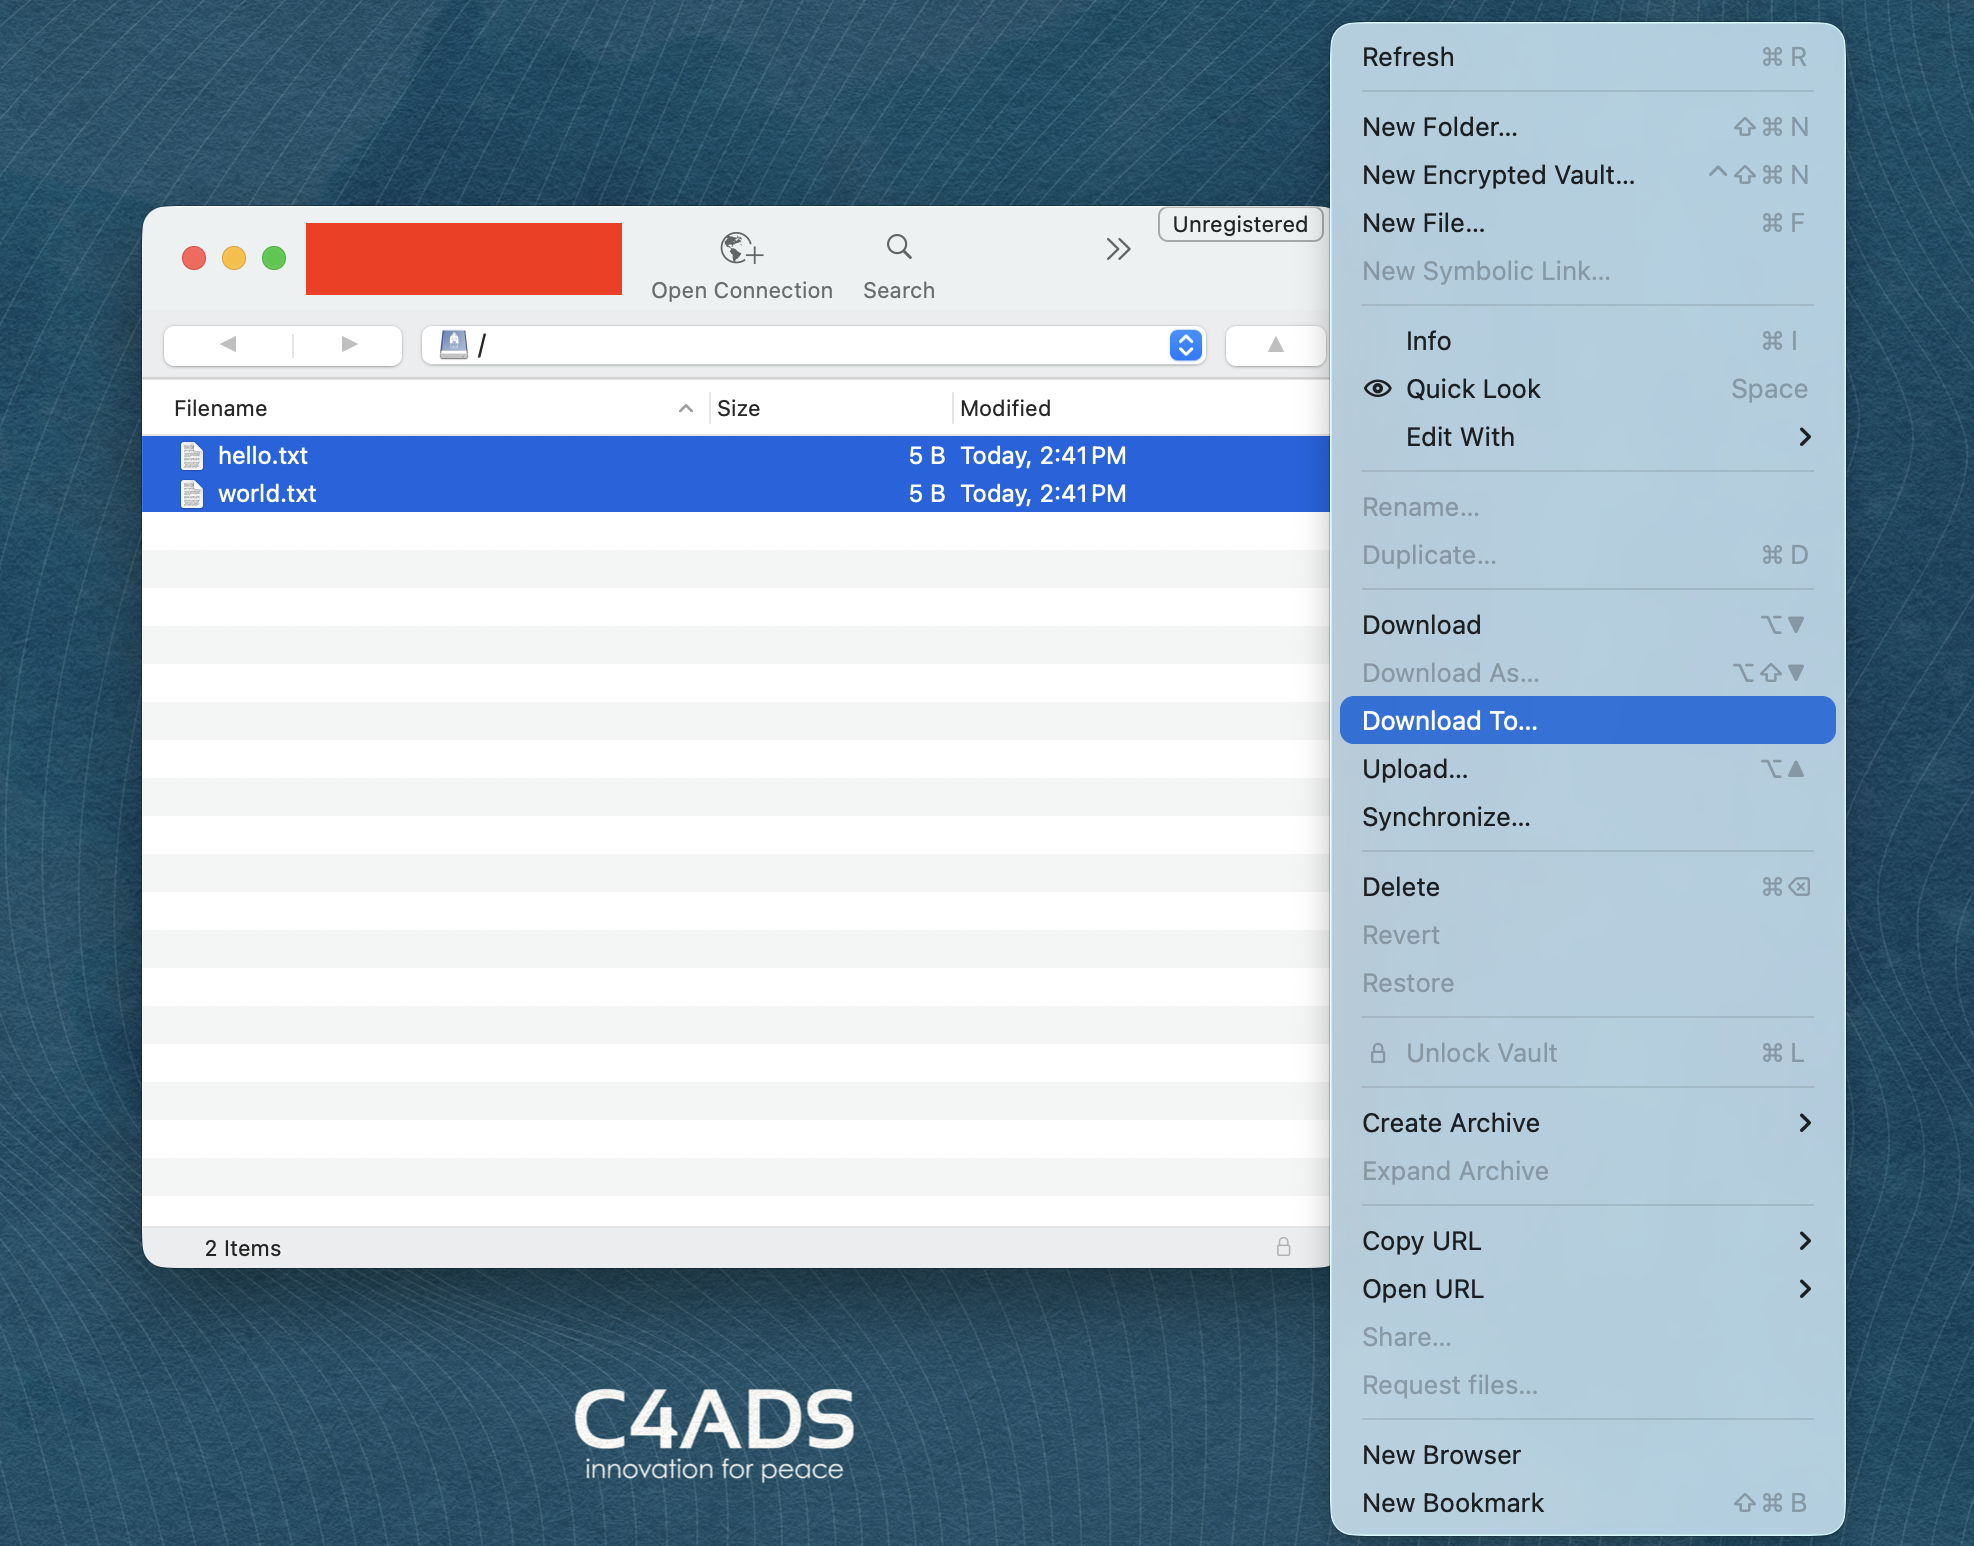
- You should now see the S3 contents at the path you specified. You can download files to the machine you are using. You may be asked to verify the fingerprint, for which you should select “Allow” again.
Wrapping Up
If you have followed the guide correctly, you should now have the SFTP server and a user. For conducting file transfers, you can use this user or create a new one, as long as the user has the correct S3 bucket access along with the correct public SSH key.
Lastly, if you provide the following to the end user, they should be able to connect through SFTP using their local configuration:
- User name
- Server URL
- Port
- SSH private key
Final Thoughts
Ensure the server is running during the transfer and turn it off once the transfer is complete. The command to do so can be found under “Actions” for the server.